I’m going to interrupt the sequential flow of the van build and cover a subject that many people struggle
with. How do you accurately locate where to drill a hole in a panel or cabinet so that it lines up with an
existing mounting point – either in the wall or on the floor.
For example, most cargo vans come with cargo tie-downs at various locations in the floor. If you remove
the tie-downs you are left with a threaded hole that you can use to secure your floor. The problem is
locating the points to drill through the floor to match up with the threaded holes.
As another example, I install rivet nuts in existing holes in the van framework which I use to attach my
plywood wall panels. How do I accurately locate the points to drill the holes in the wall panels to match
up with the rivet nuts.
In both of these examples the problem is figuring out where to drill the holes in the floor and wall panels
so they line up properly with the rivet nuts or threaded inserts.
There are lots of suggestions on how to do this on the Internet but my favorite is one my dad taught me
over 60 years ago when I was building projects in his little home workshop - Threaded Locating Points.
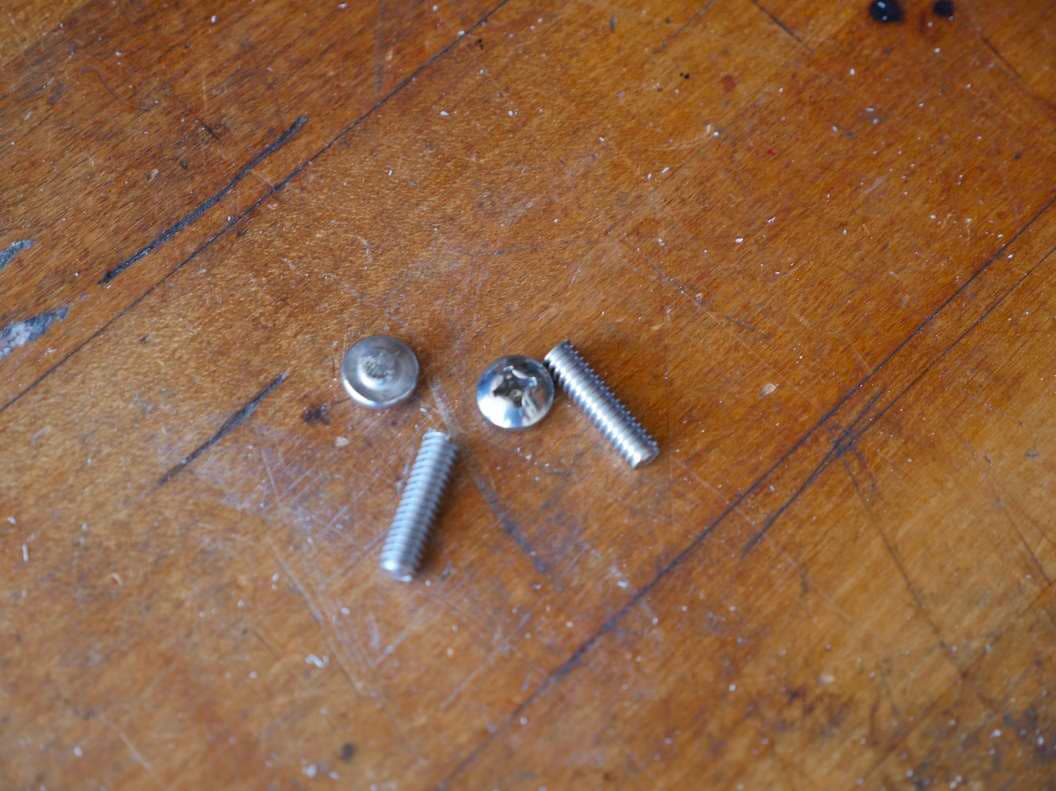
A threaded locating point is nothing more than a machine screw with the head cut off and then filed to a
sharp point. Here’s what they look like. These are ¼-20 machine screws and fit the rivet nuts in my van.
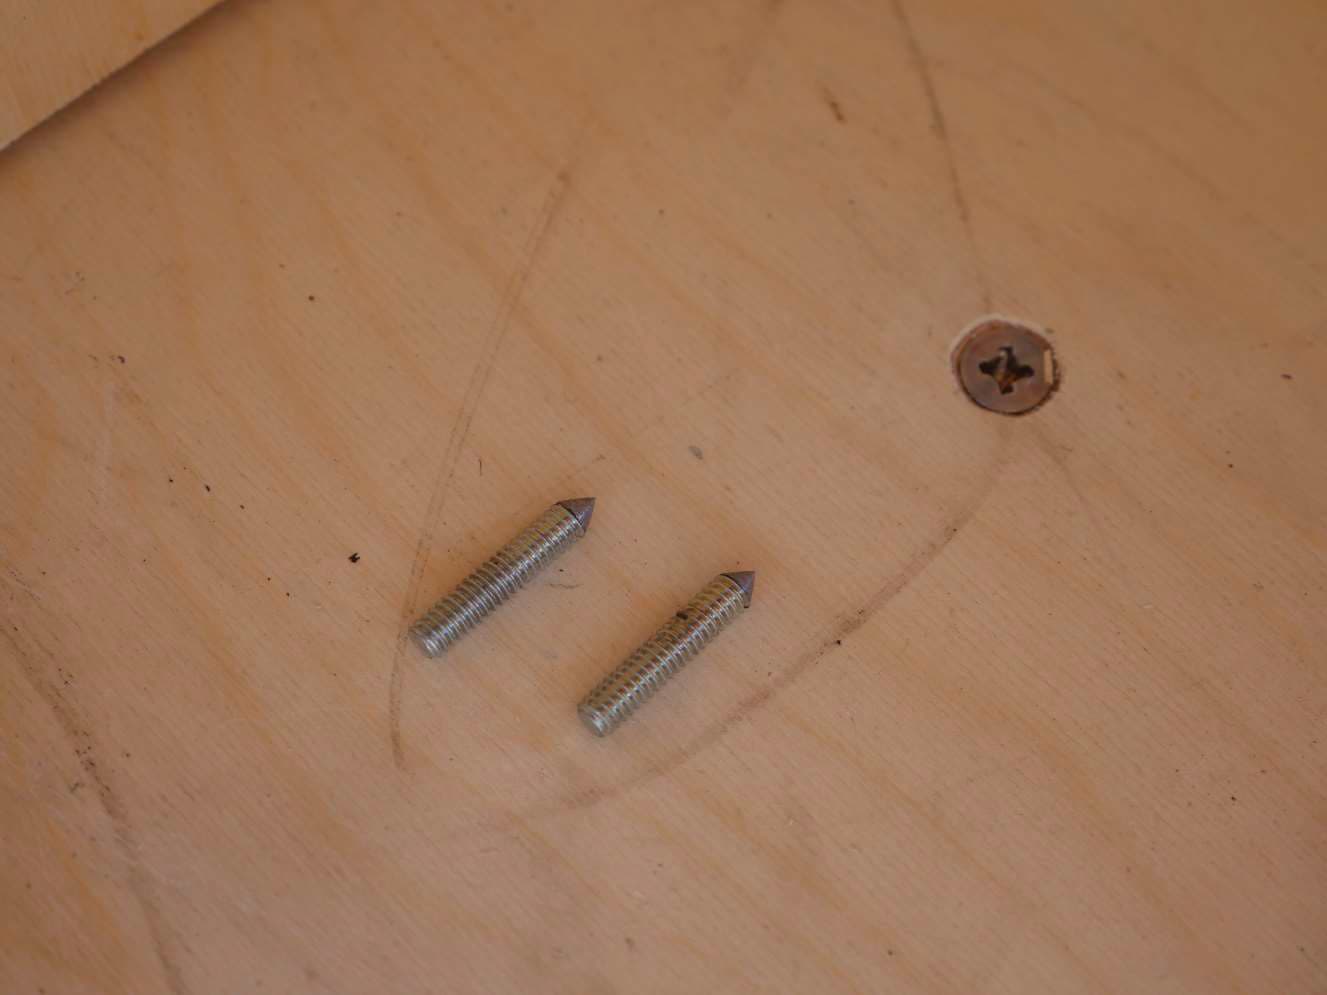
Let me show you how to make them.
Start with a machine screw about one inch long with the thread you need. I have locating points for 10-
24, ¼-20, 5/16-18, and 3/8-16.
Remember the first number is the size of the screw and the second number is the number of threads
per inch. I also have some M8-1.25 metric locating points because that is the size used for most of the
tie-down and factory threaded inserts in the Promaster van. The ¼-20, 3/8-16, and M8-1.25 are the
ones I use the most.
I always try to keep about 6 of each on hand, but when people come to my shop to work on their vans
they seem to grow legs and disappear. I guess they don’t like strangers and hide. I’ve never found their
hiding place.
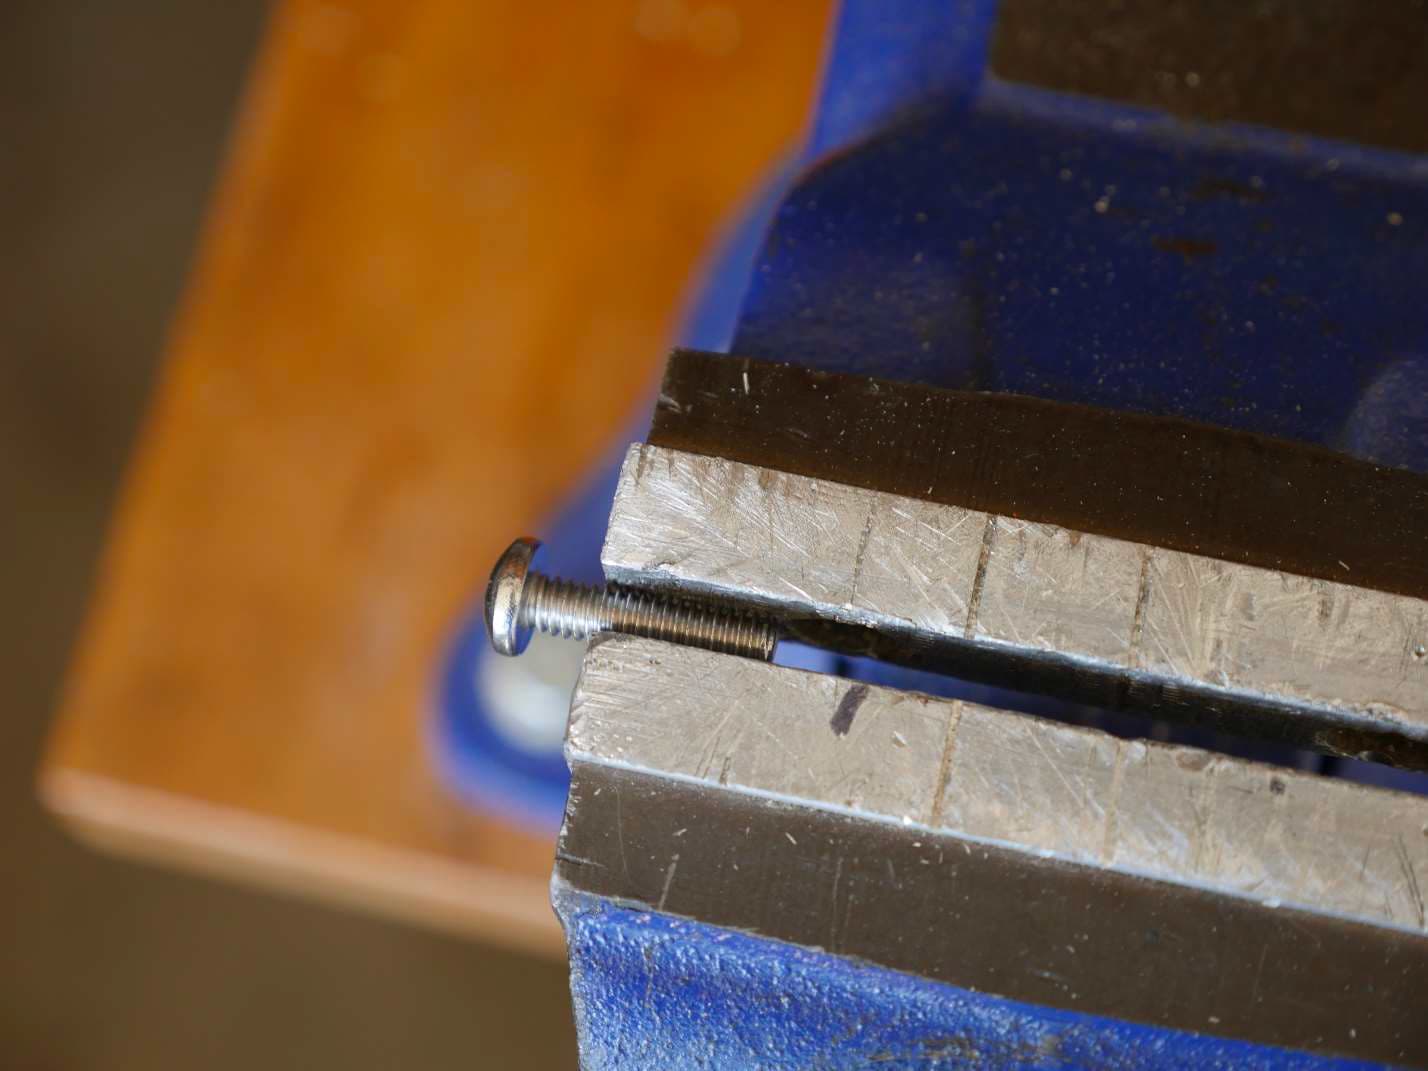
Here are a couple of ¼-20 machine screws one inch long.

Put them in a vise as shown. Don’t clamp to tightly or you’ll flatten the threads. Just tight enough to
hold.
I have aluminum soft jaws in my vise and this keeps from damaging the threads. A quick solution if your
vise doesn’t have soft jaws is to clamp the screw in the vise between two thin pieces of wood. The soft
wood will hold the screw firmly and not damage the threads.
Using a hacksaw, cut the head off of the screw.
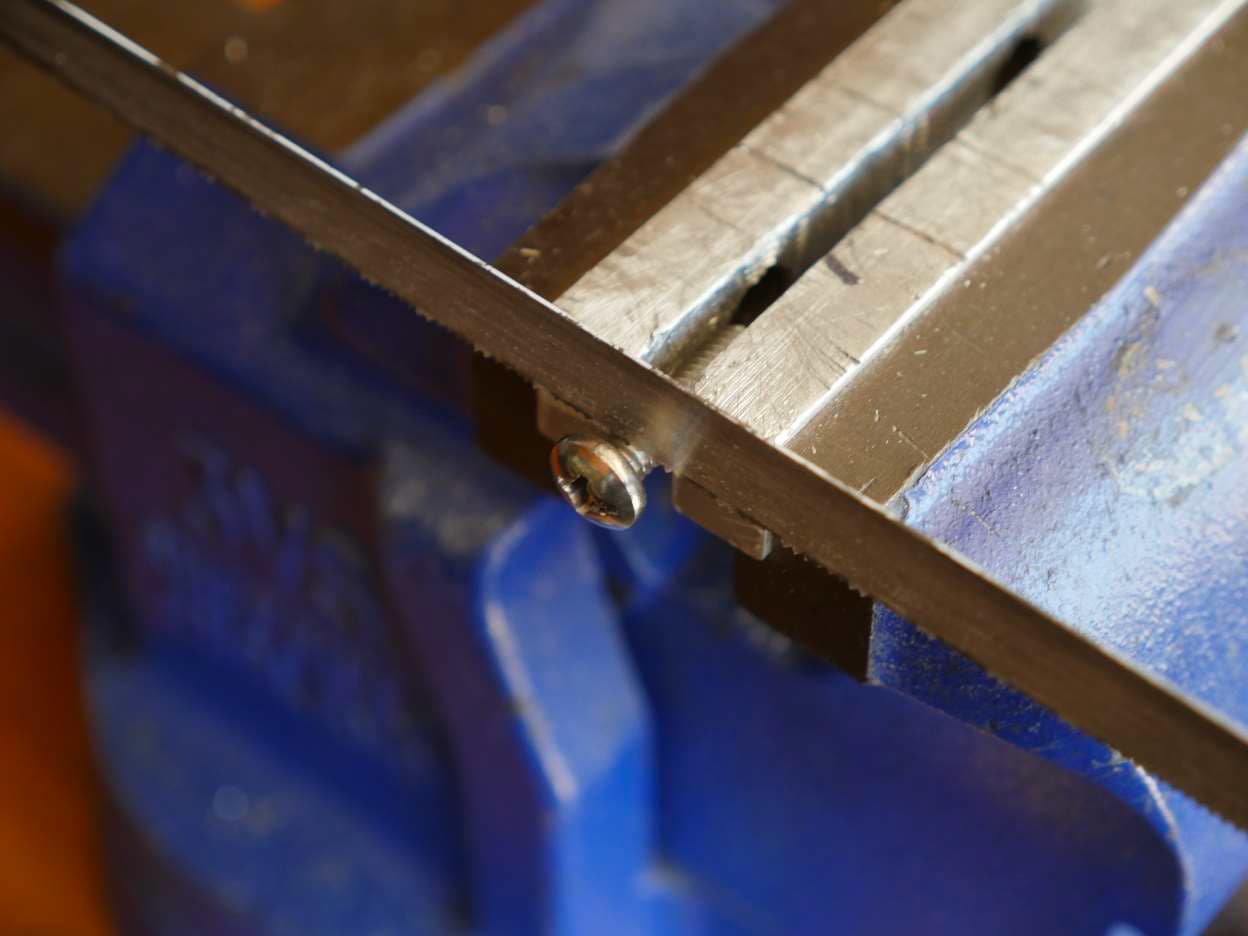
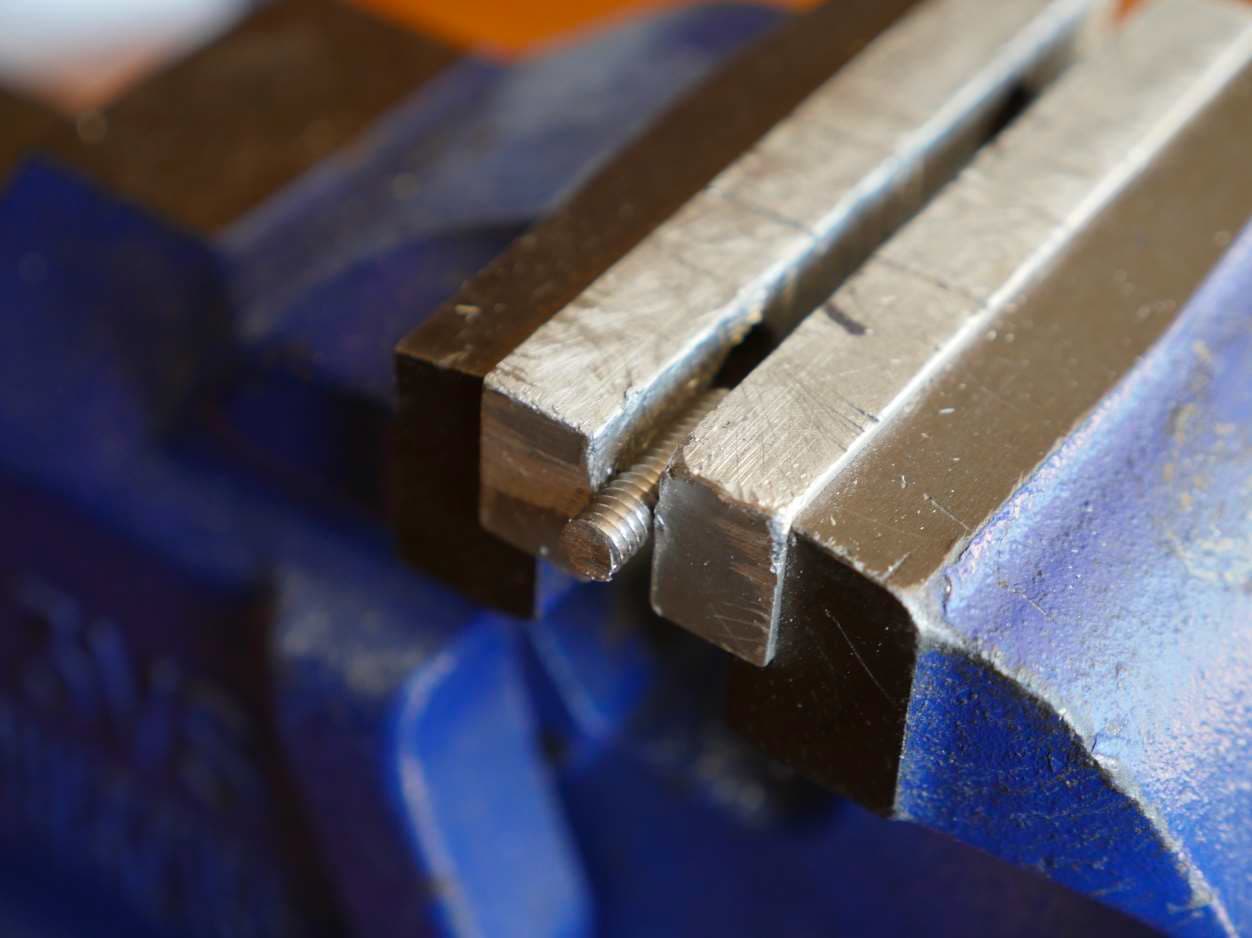
I’ve never found a use for the screw heads so you can toss them. You’re left with just the threaded
shaft. One end will still be as it came from the factory. We want to keep this end intact and not damage
it if possible. The other end will be all munged up where we cut the head off. This is the end that we’ll
file to a point.
Chuck about half the length of the screw into a drill motor with the munged up end sticking out. Clamp
the drill to a firm work surface or table.
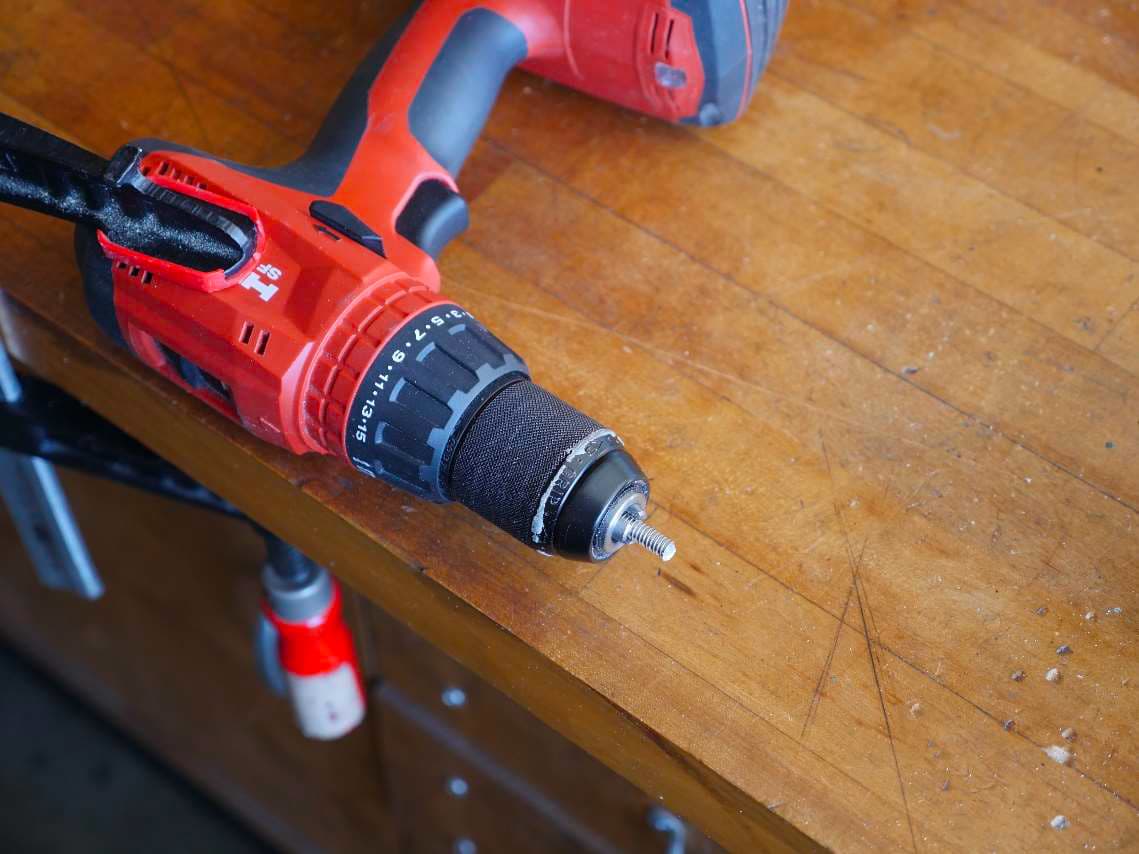
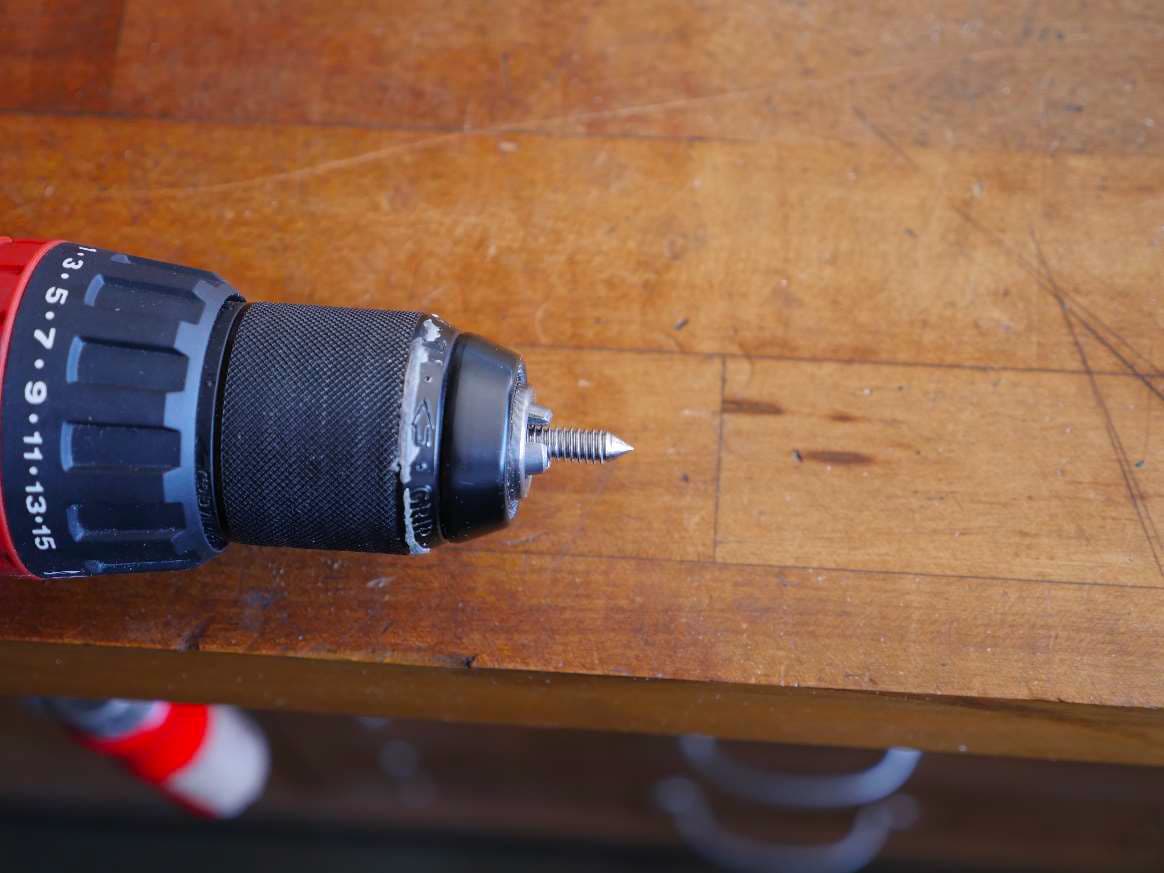
Start the drill running on the highest speed possible. Then, holding a file at about a 45 degree angle,
stroke the file firmly across the end of the machine screw and file it to a point. It doesn’t have to be
perfect, just sharp.

Tada! You just made your first locating point. Now, make several more. You’ll need them.
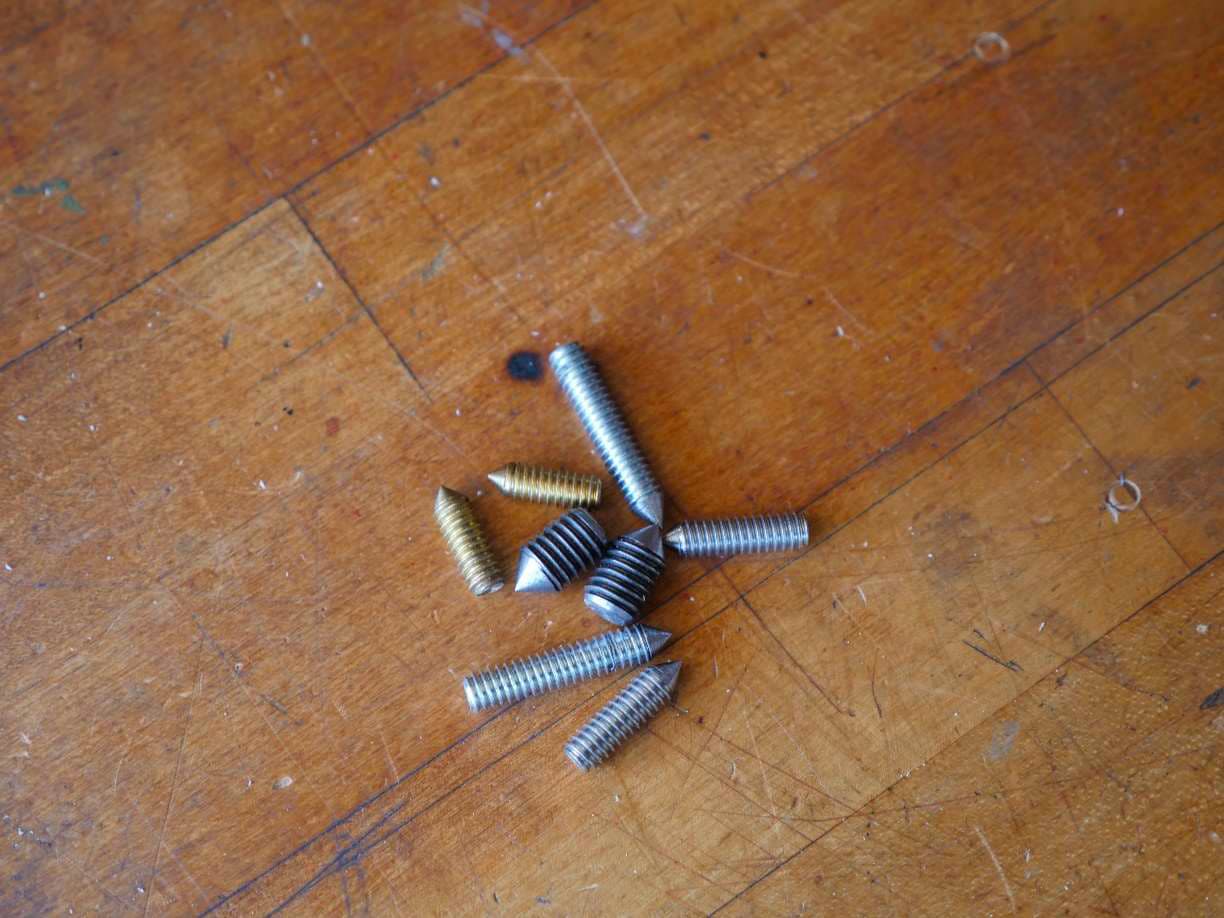
Here’s an example of some of my collection. There’s several lengths of ¼-20 and a couple of 3/8-16. I
couldn’t find my M8-1.25’s. They must be camera shy and have gone into hiding…
So how do you use these little gems.
I recently had a project where a local vandweller wanted to make a battery box for his two lithium
batteries. He made the box using cross dowels, and then we mounted it to the floor and secured it to
the adjacent wall of his van.
The wall of his van is plywood and secured to the van with ¼-20 rivet nuts. The floor of the van is the
three layer sandwich of Luan, Insulation, and ½ inch Baltic Birch.
Batteries are relatively heavy and the inertial force when going over bumpy roads can be tremendous.
We need to anchor the battery box to the rivet nuts holding the wall panel, and we’ll use ¼-20 T-nuts
with flat head screws in the floor.
Plain wood screws into half inch plywood is just not strong enough and could pull out because you have
heavy weight concentrated in a very small area and very few attachment points. T-nuts have a wide flat
washer-like base that can’t pull through the plywood, and with the added connection to the wall, all
should be well.
Our first order of business is to transfer the location of the rivet nuts in the wall to the side of the
battery box. The battery box will be located behind the wheel well between the wheel well and the rear
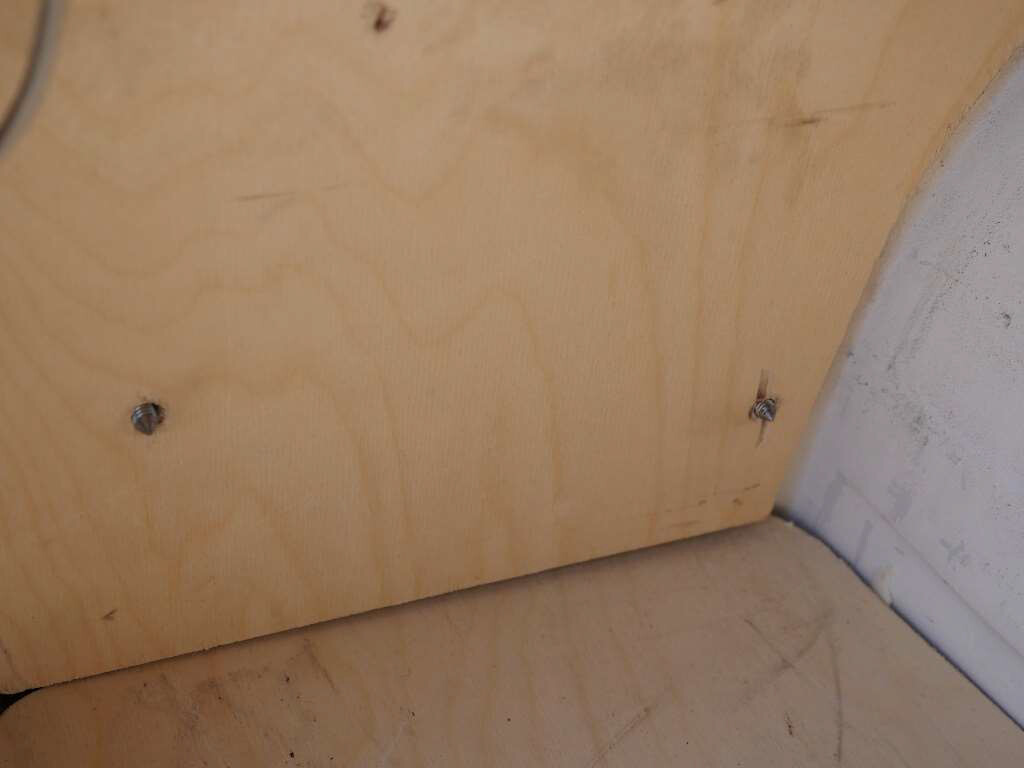
doors on the driver’s side. Here we’ve removed the ¼-20 machine screws holding the wall panel in place
and installed locating points in their place. The points are sticking out far enough to clear the plywood
wall by about ¼ of an inch.
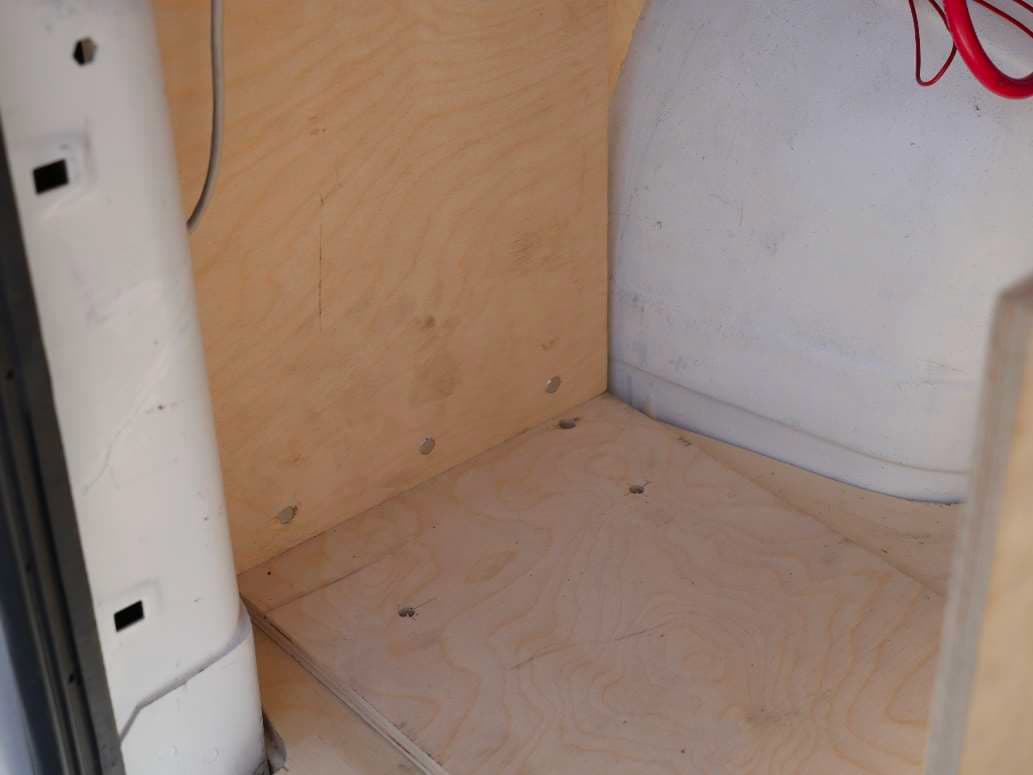
Slide the battery box into place and press it firmly against the wall and the locating points. Here you can
see the inside of the box as we’re pressing it against the wall. On the bottom you can see one cross
dowel hole drilled in error (please don’t tell anyone) and two of the holes for mounting the box to the
floor.
When we pull the box away from the wall, we should have two punch marks (circled) at the exact
location we need to drill holes to mount the box to the wall.
The box is held in place with flat head screws and it’s a perfect fit.
With the box held securely in position against the wall we marked the location for the T-nuts in the floor
using the automatic center punch. We then removed the box, drilled the holes in the floor, installed the
T-nuts by lifting the edge of the floor and slipping them in place just as we did when we installed the
threshold in the doorway in tutorial 2.
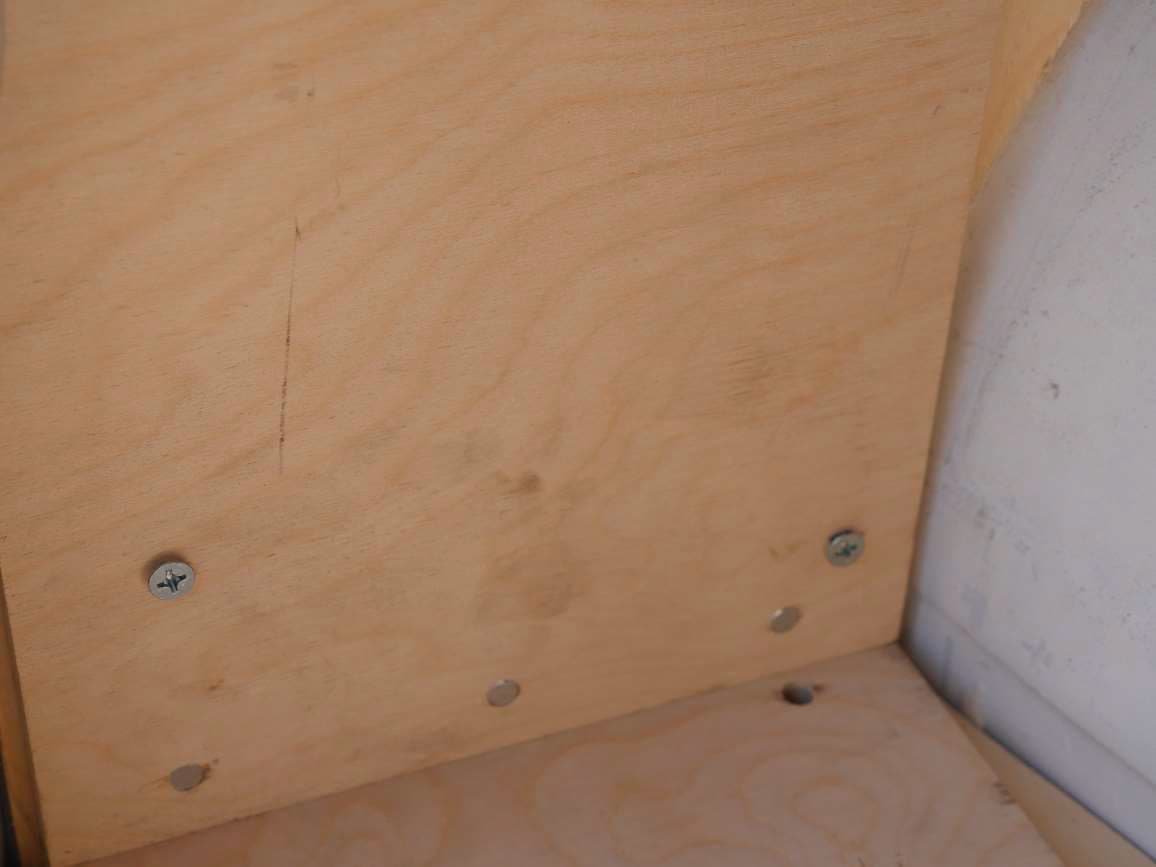
Once all the attachment points were in place we bolted down the battery box to both the wall and the
floor, and continued with the rest of the project.
Using Locating Points to Secure the Floor
When all your floor pieces have been cut and fit properly in the van, including the splines, disassemble
the floor and remove it from the van.
Install M8-1.25 locating points in the threaded inserts where the original cargo tie-down rings were
located with the points sticking about ¼ inch above the floor. Position the 1/8 inch Luan sub floor
sections in their proper positions and then press down firmly around the locating points. This will mark
the Luan sub floor. If you only have a couple of M8 locating points you can do one floor section at a
time.
Next remove the sub-floor sections and drill a small hole, say 3/16ths, through the Luan at each of the
point locations. This will make it easy to find these points when you’re ready to drill through the
insulation and Baltic Birch floor.
Reassemble each section of floor, one section at a time, into it’s 3 layer sandwich.
Turn the sandwich upside down. Your Luan should be on top, then the insulation layer, and finally the
Baltic Birch. Make sure that the bottom surface of each layer is up.
Carefully align all the edges of the layers. I set the sections up on saw horses so that I have clear access
to all the edges.
Once everything is aligned, take a couple of clamps and clamp the layers together. You don’t want them
to move when your drill your holes. After clamping, double check the alignment.
Now locate the 3/16 inch pilot holes you drilled at the tie-down locations on the Luan sub floor.
Carefully drill a 3/8 inch hole straight down through the Luan, insulation, and Baltic Birch at each
location.
Rinse and repeat for each floor section. When completed, reinstall your floor and if you were careful
with your work, the 3/8 inch holes in your floor will line up with the threaded tie-down points in the van
floor.
Most of the tie-down points will be hidden by cabinets and I usually use M8-1.25 pan head screws with a
washer to secure the floor at these points. However, some tie-down point will be exposed in the open
floor areas like right in front of the sliding door. At these points I counter sink the floor and install
flathead screws flush with the floor. Some people prefer flathead screws at all locations. Up to you.
Using Locating Points to Attach Wall Panels
I use rivet nuts and machine screws to attach my wall panels to the side wall framework of the van.
To start, you’ll need to install rivet nuts at all places you want to put screws to hold the wall panels in
place.
Cut your wall panels to fit.
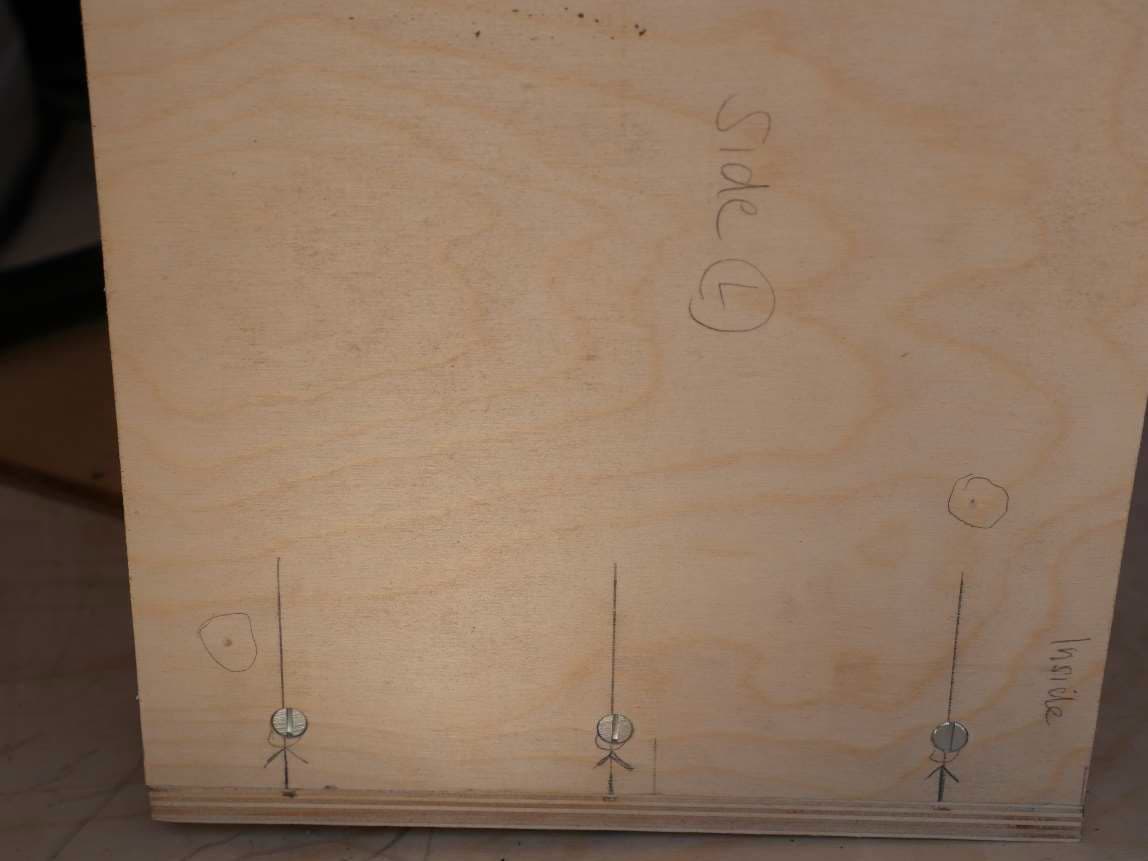
Install two locating points. One in the rivet nut that will secure the top right corner of the wall panel,
and one in the rivet nut that will secure the top left corner of the wall panel. The locating points should
stick out about ¼ inch beyond the rivet nuts.
If the wall panel is large, this next step might be easier with two people but it can be done by one
person.
Carefully position the wall panel in its proper location. While one person holds the panel securely in
place, the other person can press down firmly on the wall panel over the locating point locations. This
should accurately mark the panel at the upper left and right mounting locations.
Assuming you are using ¼-20 rivet nuts and screws, drill a 9/32 hole at the two marked locations. 9/
doesn’t leave much wiggle room. You want the panel to be held as accurately in position by these to
mounting screws as possible. These two screws are the primary reference for all the other screw
positions.
Remove the locating points from the left and right corner positions and reinstall them at other locations.
If you have more locating points you can install these as well. I usually install four to six locating points
at a time.
Now hold the panel in position and secure it lightly with machine screws through the upper left and
right corner holes you just drilled.
Once the panel is in place, press firmly on the panel over all the new locations where you have installed
locating points.
Remove the panel and this time drill 5/16 holes at all the newly marked points. This larger hole size will
make mounting the panel easier once all the hole positions are located and drilled.
Reposition your locating points to new locations, rehang the panel from its original corner mounting
holes and repeat the above process until all the mounting holes have been located and drilled to
5/16ths.
After all the holes have been located and drilled, enlarge the original corner holes to 5/16ths. The panel
is now ready for final installation. Since it is being mounted with machine screws, it can easily be
removed at any time for painting, adding wiring, or for any other reason.
Using Locating Points to Mount Support Beams.
Let’s assume you wish to mount a bed platform across the rear of the van to create a garage space
underneath the bed. To do this you need to mount a 4 ft long 2x4 attached to the frame of the van, one
on the driver’s side and one on the passenger side.
The Promaster has a heavy unibody frame member that runs along the sides of the van about a foot and
a half above the top of the wheel wells. You think this is the perfect place to attach your 4 ft bed frame
supports. It would put the bed about 34 inches above the floor and give you plenty of garage space
underneath.
You install 4 rivet nuts in the unibody frame, spaced about 8 inches apart on both sides of the rear of the
van. This would put support bolts two inches from each end of your 4 ft long 2x4’s and eight inches
apart in between.
To mount your 2x4 supports, install locating points at the two end rivet nut positions. Don’t put locating
points in the middle rivet nuts yet. You want the 2x4 to move freely over just the two outer mounting
locations so that it is easy to position.
Now position your 2x4 exactly where you want it and press it firmly into the locating points.
Drill these positions with the appropriate sized drill.
Now you can install locating points in the middle positions. Mount the 2x4 loosely in place with bolts in
the two end holes and press firmly over the center mounting positions.
Remove the 2x4 and drill the remaining mounting holes.
Repeat for the other side of the van.
General Observations
When mounting vertical or horizontal supports, locate and drill the two end points first, then remount
and locate the center mounting points.
When mounting large panels, locate and drill the upper left and right corners. Drill these holes about
1/32 larger than the mounting screws. Then locate all the other mounting positions with the panel
hanging from the original corner mounts and drill all the new holes 1/16 larger than the mounting
screws. Once all holes have been located, drill out the original corner holes from 1/32 to the larger 1/
over sized hole.
Why drill the original corner holes larger you ask?
When you are locating hole positions you want the greatest accuracy you can get, so you make the
original holes as close fit as possible so the panel has little or no wiggle room to shift position.
Once all the holes are drilled and you are ready to mount the panel, you are faced with a different
problem. The sides of a vehicle are not perfectly flat. As you start adding mounting screws your panel
will bend and warp slightly to conform to the side of the van. This will cause some of the holes to move
slightly out of perfect alignment and you’ll need the extra clearance to be able to install all the mounting
screws.
Locating points are not perfect, but they’re the best solution I’ve found so far. No matter what you do
you’ll probably need to adjust one or more of the holes in a large panel to allow you to install all the
mounting screws. If they are off more than about 1/32 of an inch (one millimeter) it could keep the
mounting screw from going in straight enough to properly catch the threads of the insert or rivet nuts.
If this happens, (and it will), you could keep drilling the offending hole larger and larger, or abandon it
altogether. The best solution is to use a 6 inch round bastard file (often called a “rat tail file”) to remove
only the small amount of material keeping the screw from going in straight. This is quick work and only
takes a few seconds. All the big box stores carry these files and they are inexpensive at less than $10.
Six inch is the best size for our use. Eight inch or larger and the diameter of the file will be too large to
fit the holes.
Sorry no photos for most of this. Will add them as they become available.
MORE TO COME
7. The Bed Platform
9. Adding a Face Frame to the Bed Platform