A few words before we start. The model we’ve been working with is a close representation of the lower
bunk in my personal 136 Promaster. It has a head board, foot board, and I chose drawers instead of
cabinets or bins for easier access without getting on my hands and knees. A more common practice in
bed design is to use some sort of hinged top where the bed platform lifts up to provide access to the
storage space below. Many of you will want the bed to expand so that two people can sleep
comfortably. The point is, use whatever design YOU prefer.
You can find lots of help with how to make an expanding bed platform, use hinges, cupboard latches,
and the like. Not much out there on using cross dowels, so that’s the focus of this project. I’m not
trying to make a perfectly accurate build, I’m showing problems that you’ll experience in different
situations and how to deal with them.
I’m using a small model so you can see more of the context around what I’m doing. The concepts are
exactly the same for full sized construction. The only difference is the size of the panels and the number
of cross dowels you’ll use.
For the most part, where you place your cross dowels and how many you use is up to you. Accuracy in
placement is not necessary. The only place where absolute accuracy is needed is aligning all the holes
associated with each cross dowel position. When we made our corner joint we made sure everything
lined up by laying the panels side-by-side and then marking across the joint where we wanted to install
our cross dowels. This assured that the holes drilled in one panel lined up with the opposing holes in the
other panel.
Throughout this tutorial I’ll be using this same idea of marking both panels at the point where I want to
install a cross dowel. Sometimes, I’ll be able to lay the panels flat, however, in most cases, I’ll be
marking the panels where they join at right angles. I’ll then take them apart and extend the lines to
install the cross dowels just as we did in the corner joint. Keep this in mind as you move through this
tutorial.
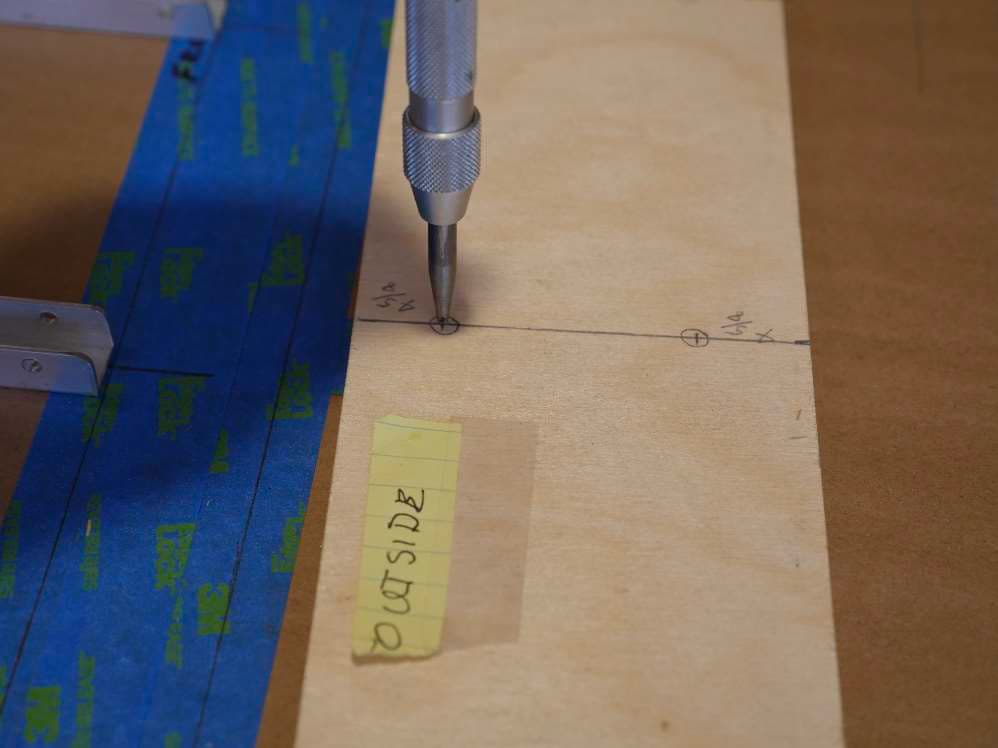
Often I’ll only be able to use the jig to install the cross dowel and its intersecting hole. I referred to this
as the “inside” panel in the corner tutorial. The through hole in what would be the “outside” panel will
often be located in the middle of a panel where the jig can’t reach. Various situations of this sort are
what we’ll be covering in this tutorial.
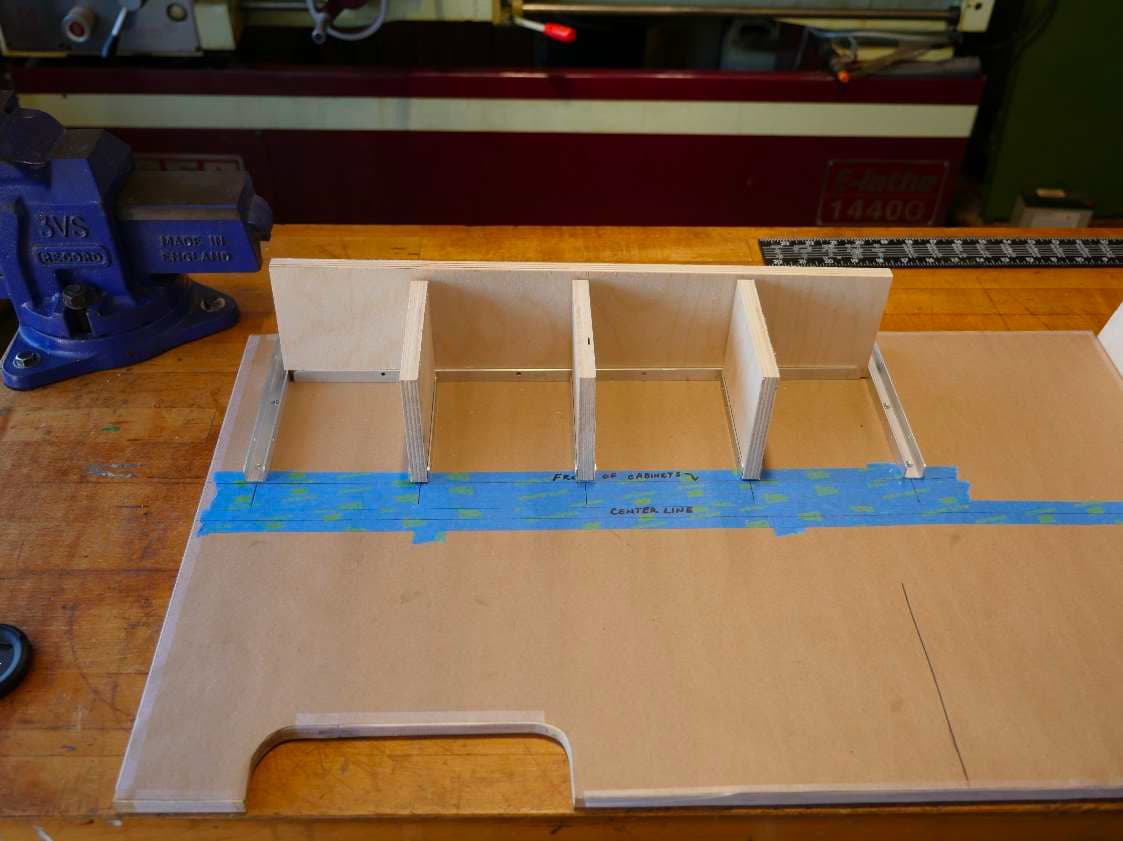
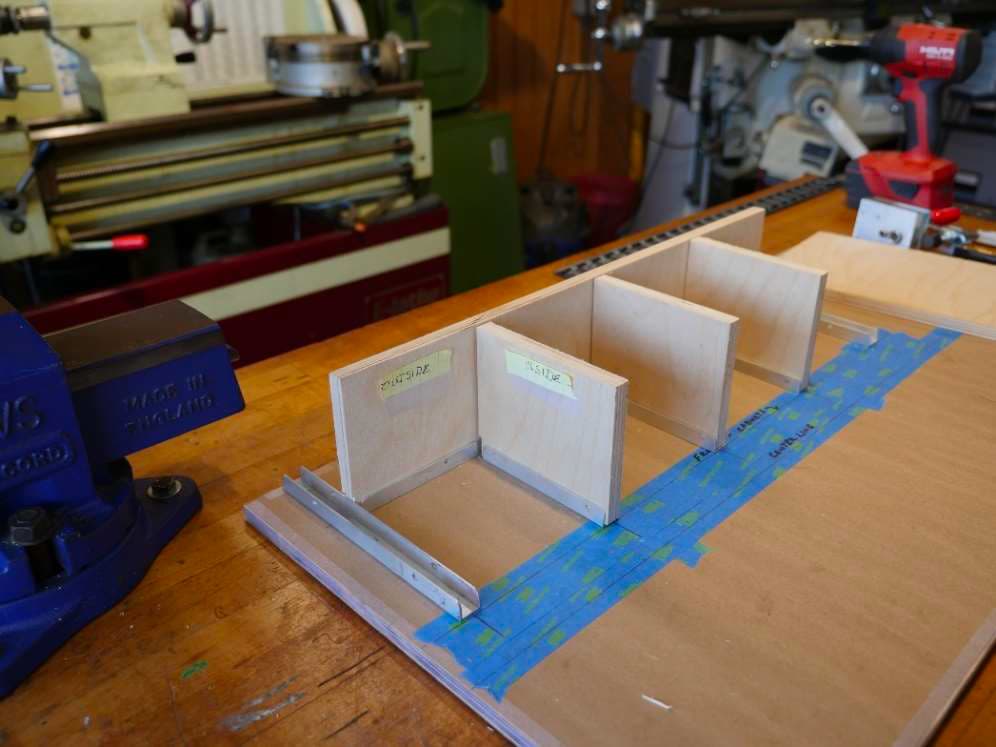
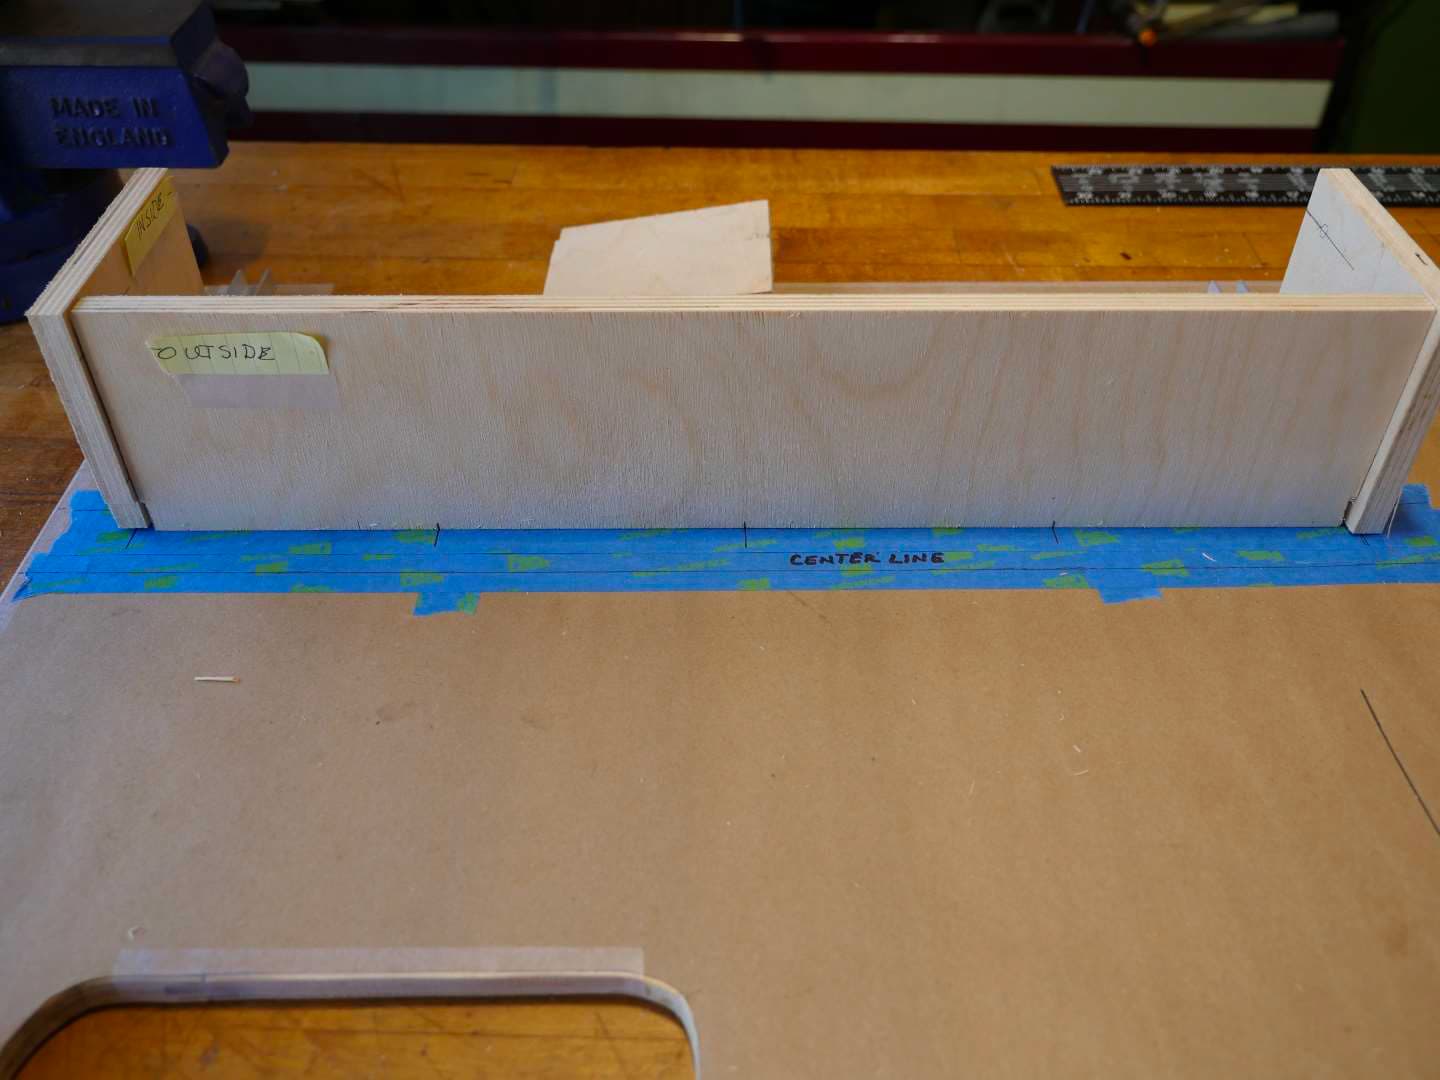
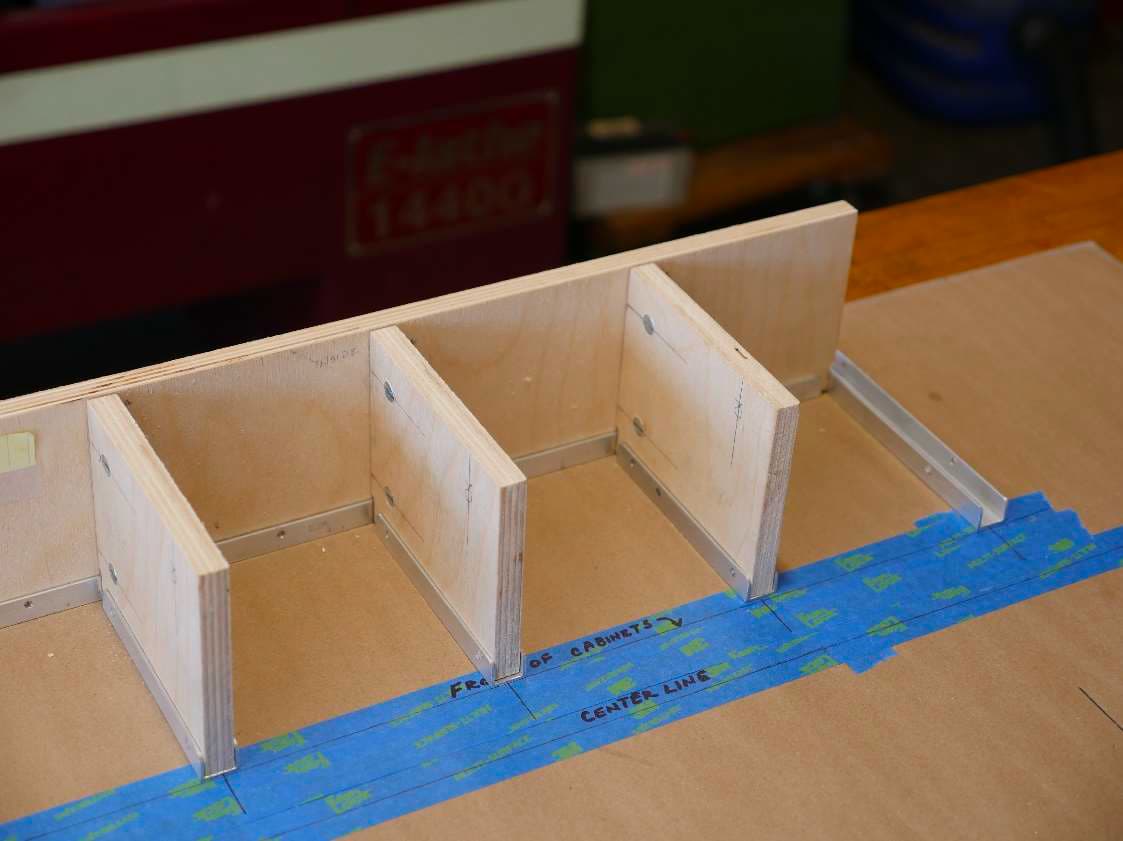
I start by cutting all my panels to size and insert them into their proper C-channels to check for correct
fit. Here’s a photo of all the pieces assembled in their proper place.
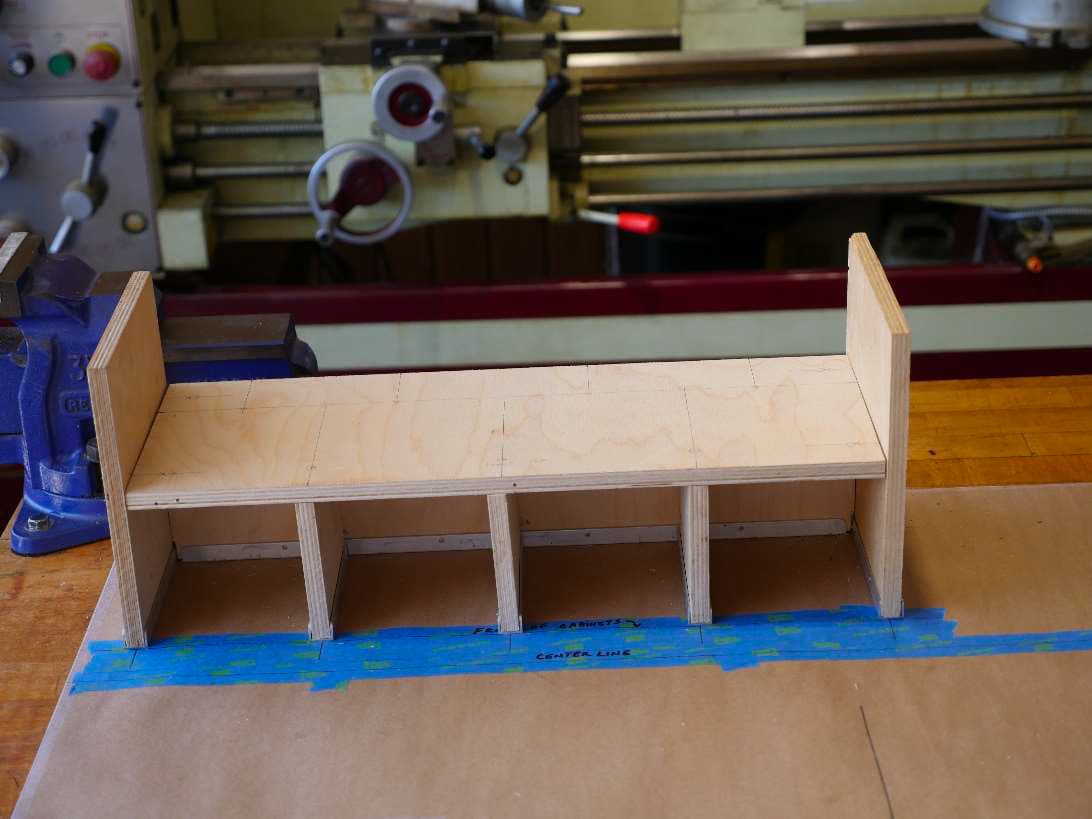
Both the back panel and the top bed platform fit between the head and foot board. To determine what
length to cut them measure between the inside edge of the headboard channel and the inside edge of
the footboard channel.
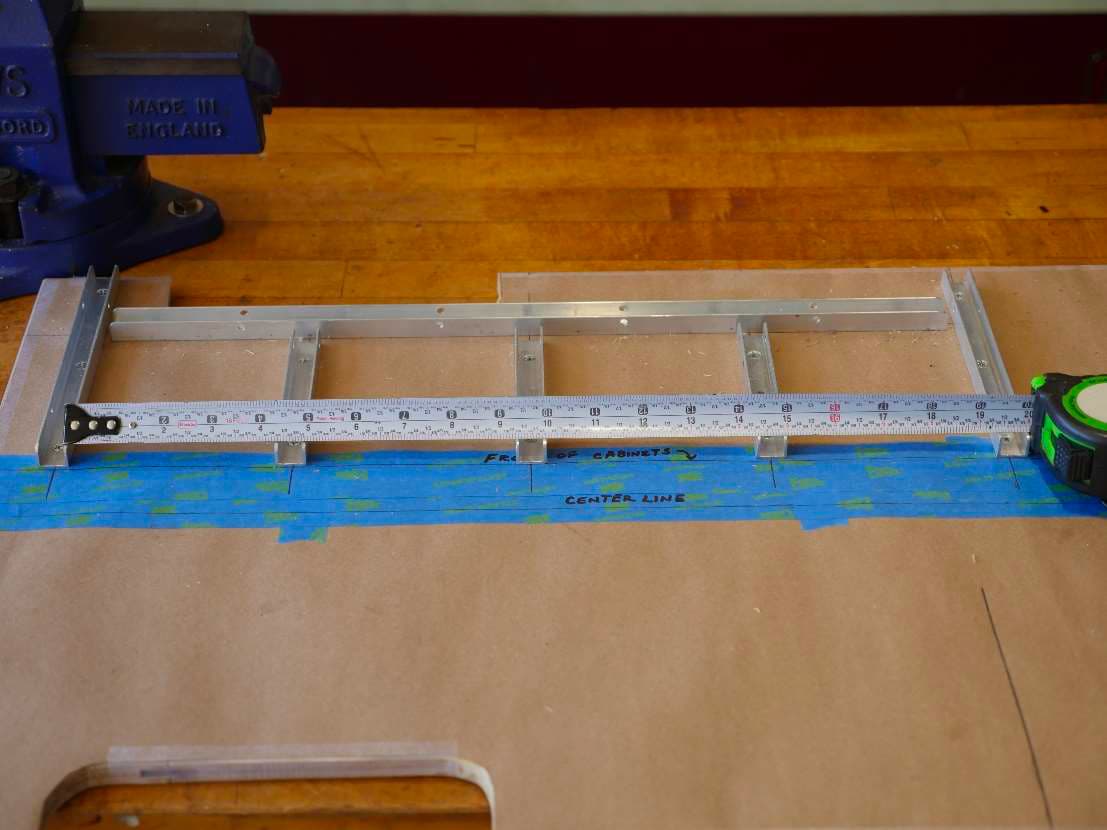
Here you can see that the distance between the inside edges of the channel is 19 7/16 inches so this is
the length we cut our back panel. The bed platform that sits on top is cut to this same length. The
height of all the vertical panels is a decision you’ll have to make. These could be the verticals panels for a
36 inch tall kitchen cabinet, or as in this case just high enough to clear the wheel wells for the bottom
bunk bed. In this model the height of the panels is 4 inches.

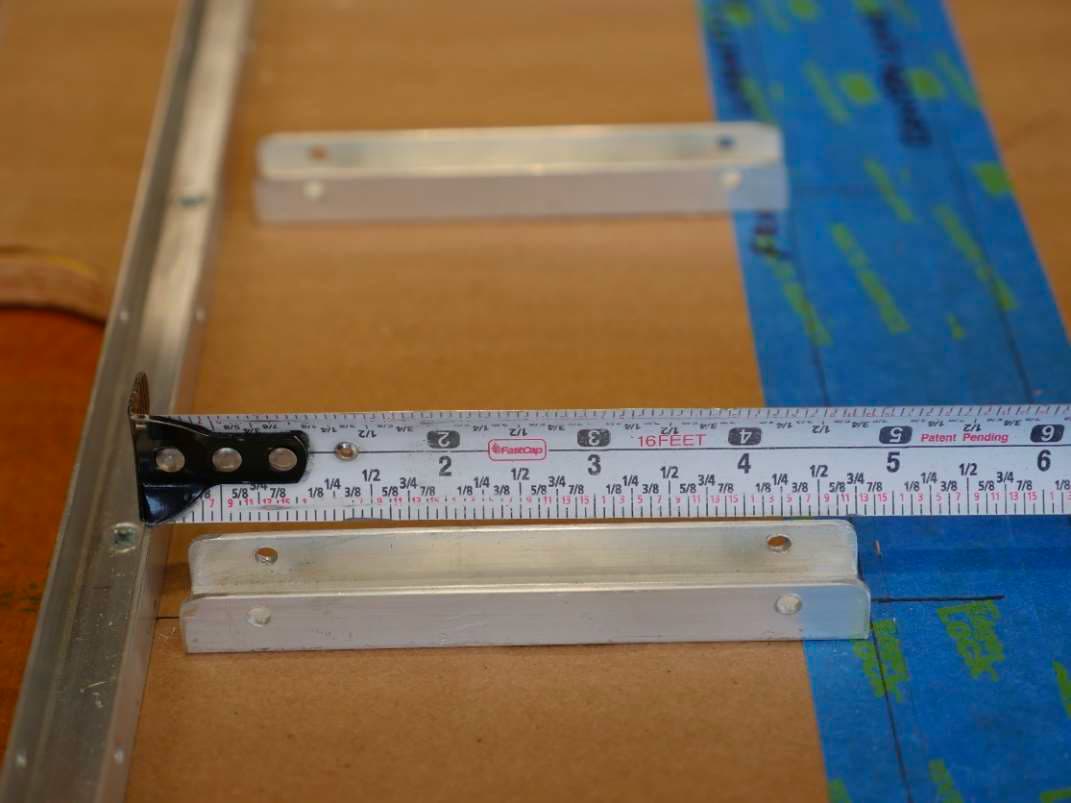
To determine the length of the divider panels, measure from the inside of the rear panel C-channel to
the front cabinet layout line – 4 ¾ inches on this model (in the actual build this was 18 inches). The
height of the divider is the same as the back.
The head and foot boards are measured from the van wall to the front cabinet layout line. Again you
determine the height you need. I made my headboard tall enough to support all my electrical stuff
(charger, inverter, fuse panel, switches, etc) because my batteries are in the compartment right behind
the headboard. My footboard makes up one side of the cabinet that holds my Porta Potty and several
drawers.
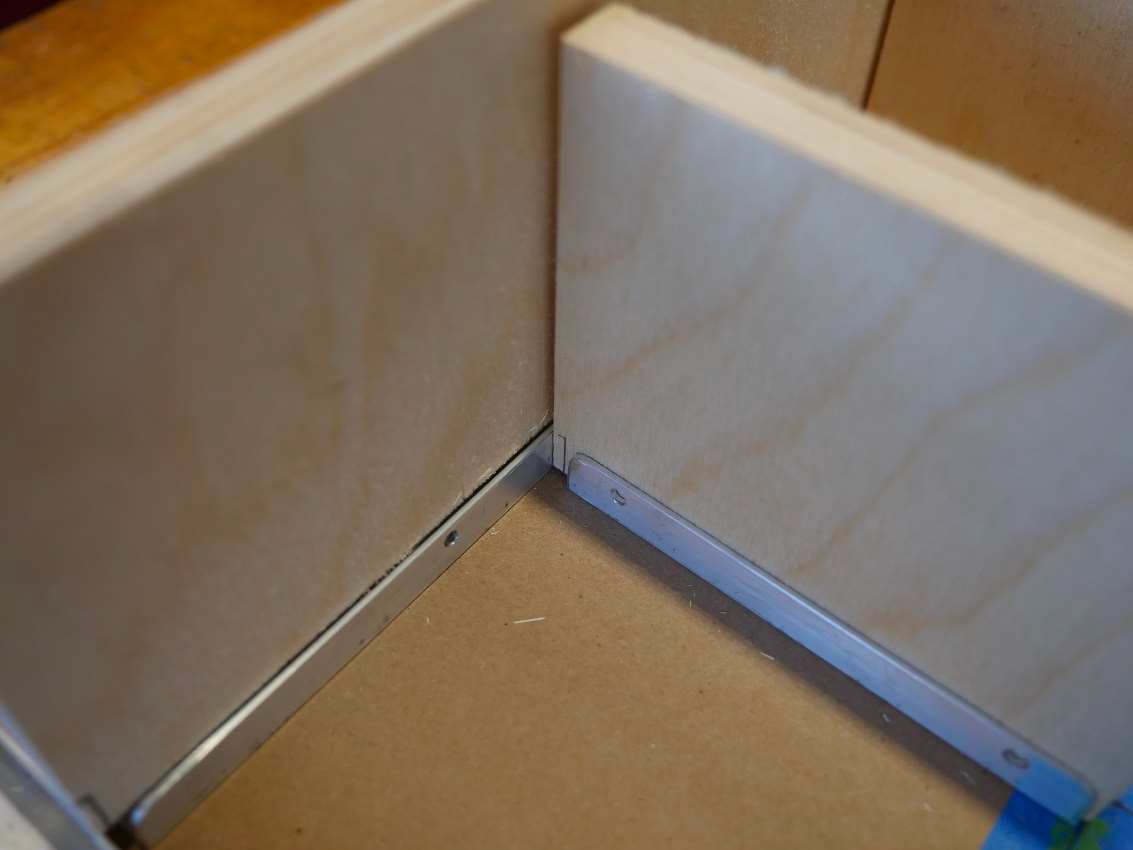
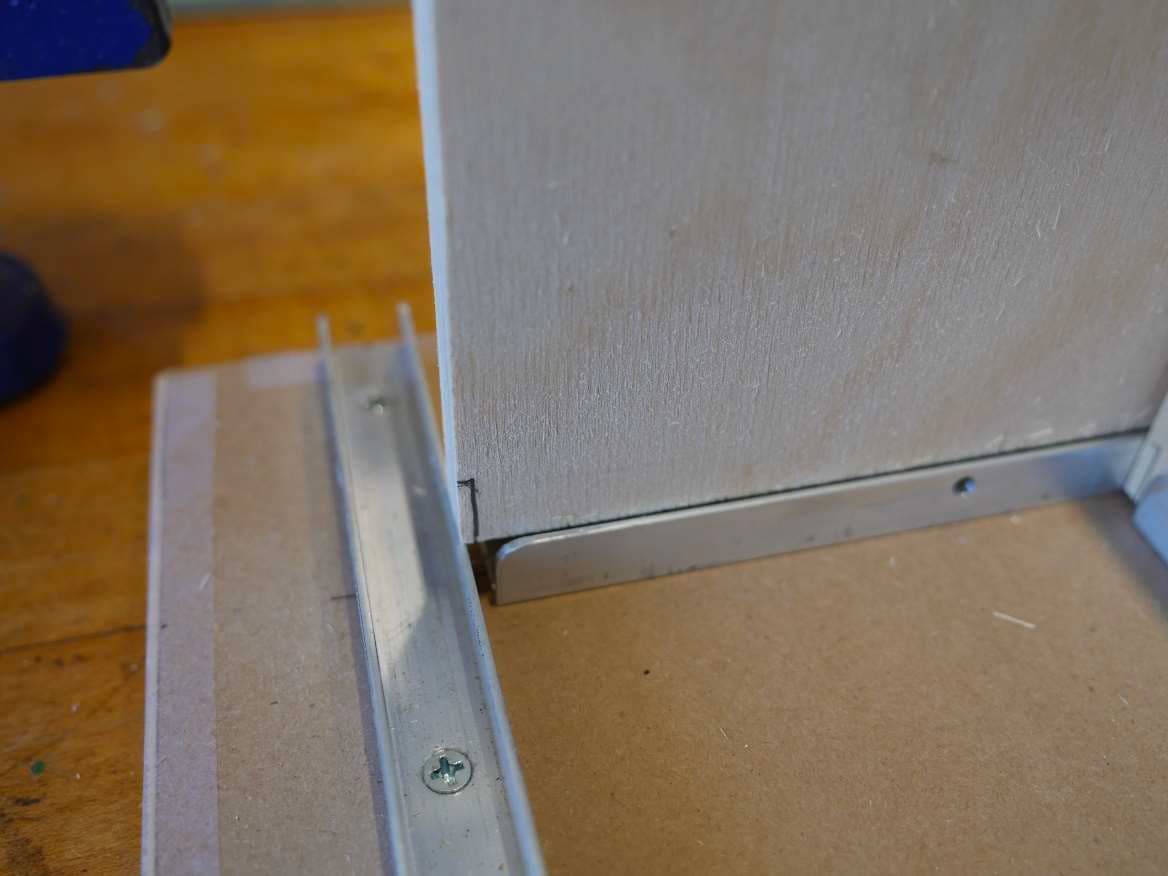
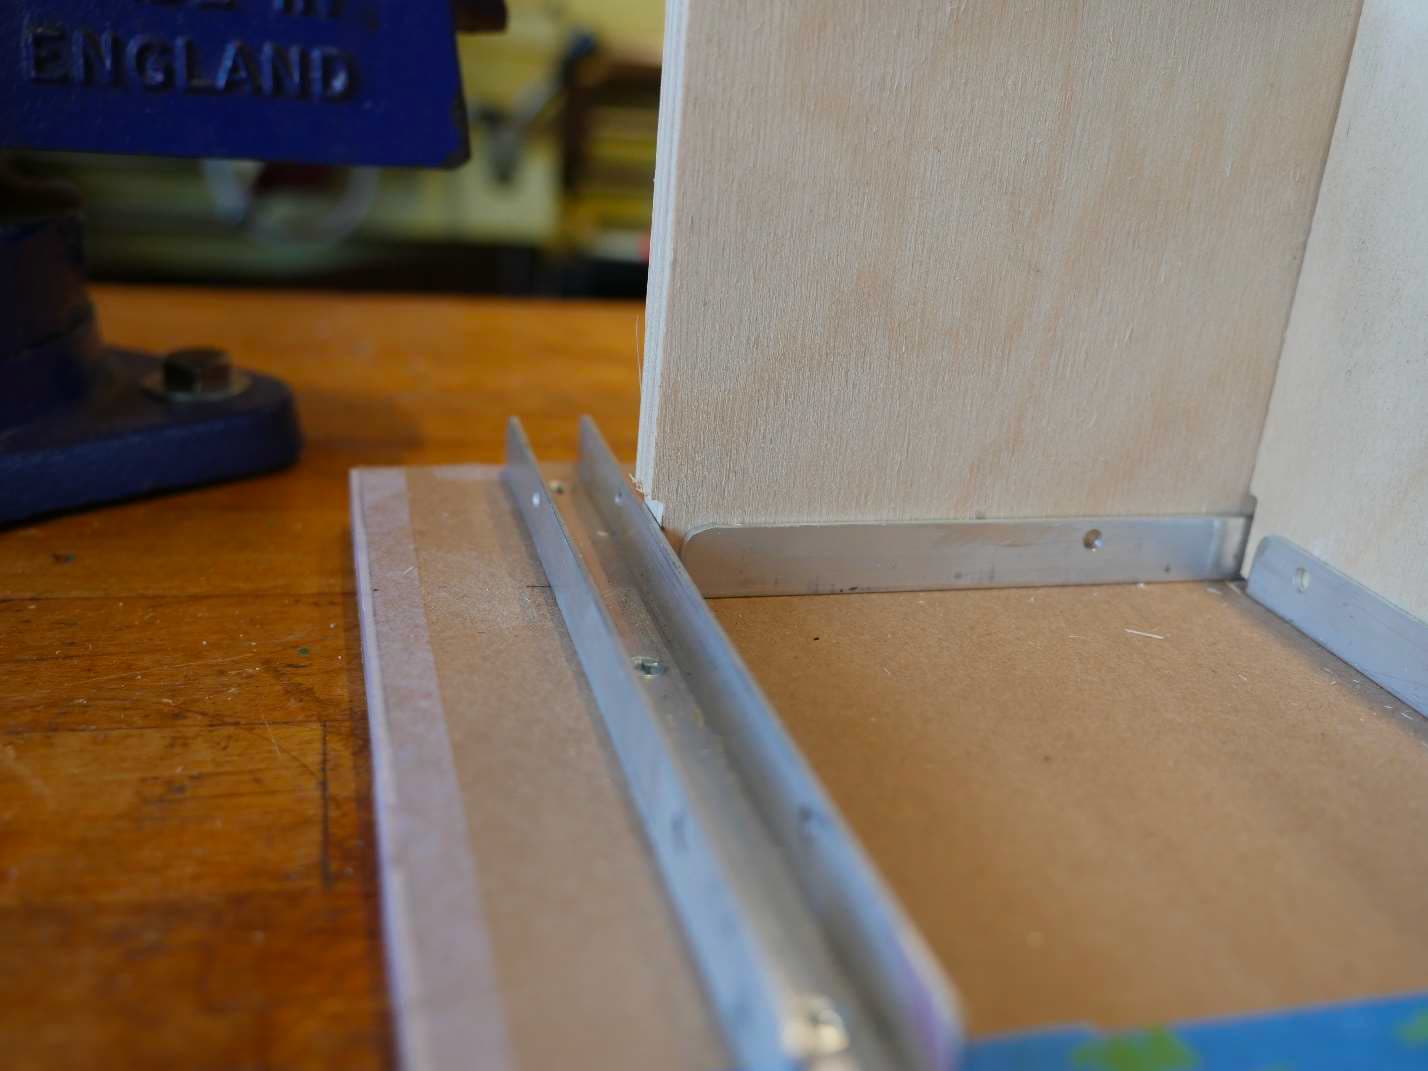
After I cut all my panels its time for a test fit. Hmmmmmm, there’s a gap between the rear panel and
the dividers…
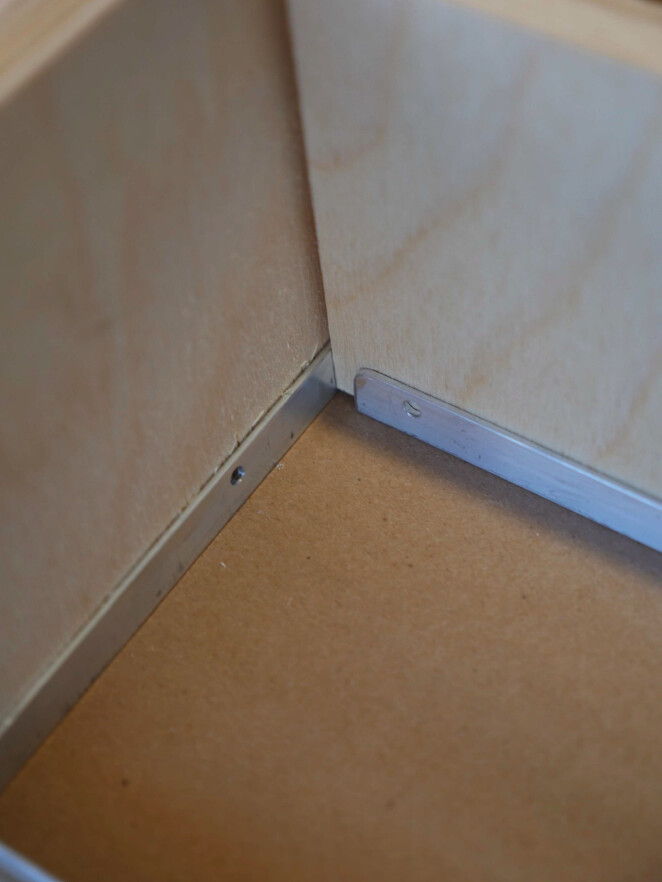
And the back panel doesn’t seem to fit!
This is an issue that you’ll have to deal with when using C-channel as your anchor system. To solve the
problem you’ll need to file a shallow notch that clears the edge of the aluminum channel. For this I use
a wood rasp which is just a fancy name for a very rough file made for wood rather than metal. The
notches only need to be 1/16 inch deep by ½” high and a rasp does the job in a jiffy.
Now that everything fits correctly we can move on to marking up the panels for cross dowels. In the
corner example I used the term “inside” to designate the panel that holds the cross dowels, and
“outside” for the panel that has the single small through hole. I’m going to use the same naming
convention here. The divider panels are the “inside” panels and carry the cross dowels, and the back
panel is the outside panel with the single small hole for each cross dowel location.
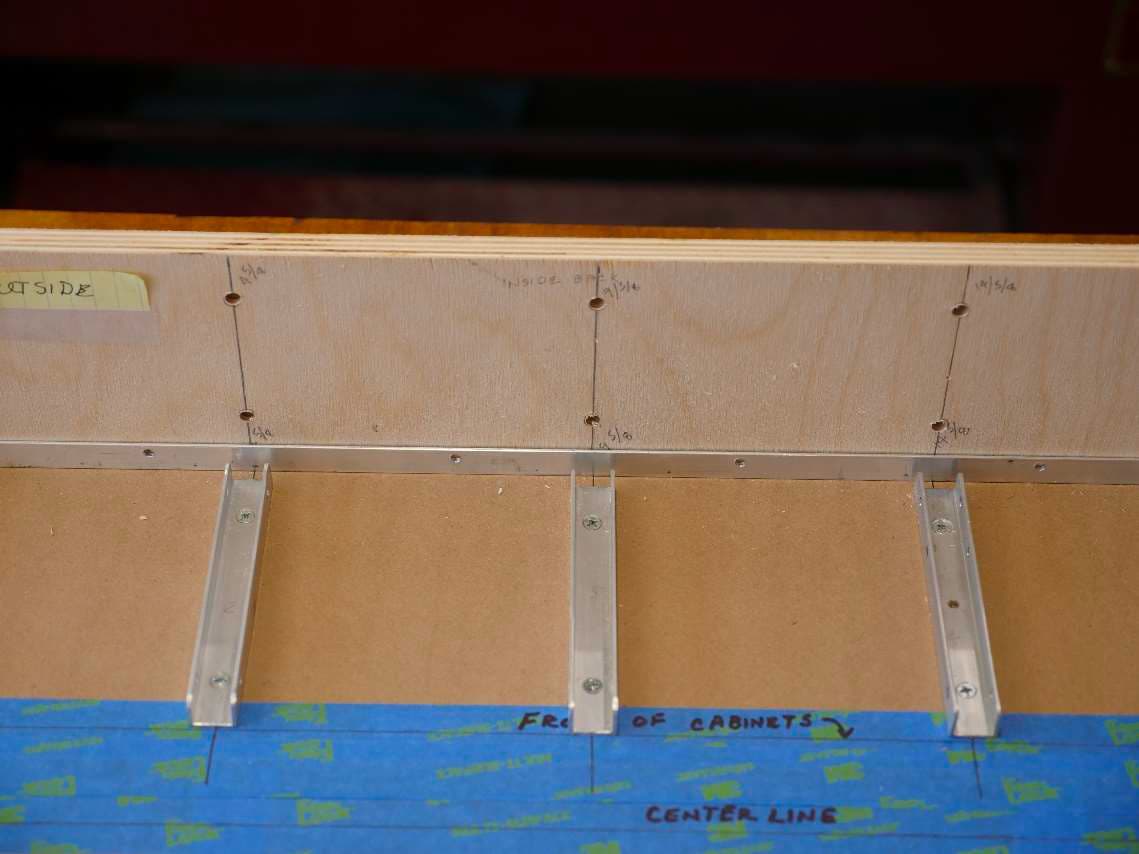
I’m first going to decide where to install my cross dowels in the rear edge of the divider channels. I’ve
decided that I’m going to install a cross dowel ¾ of an inch from the top and a second one 1” from the
bottom. The space at the bottom is larger to clear the c-channel (but mostly for looks as ¾” would have
been fine).
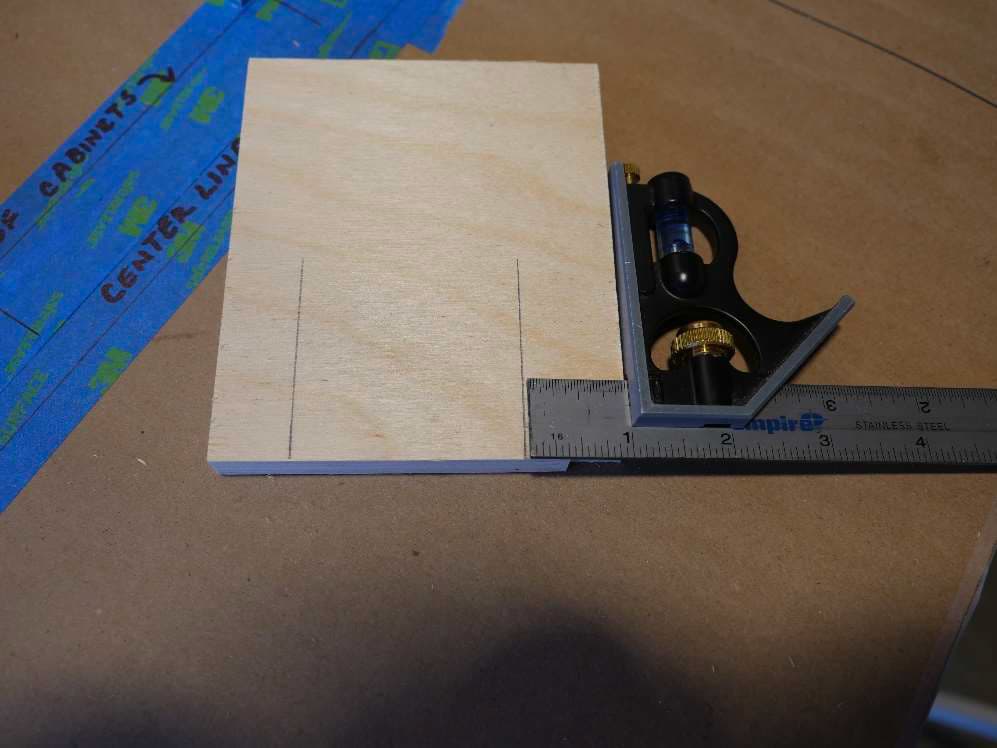
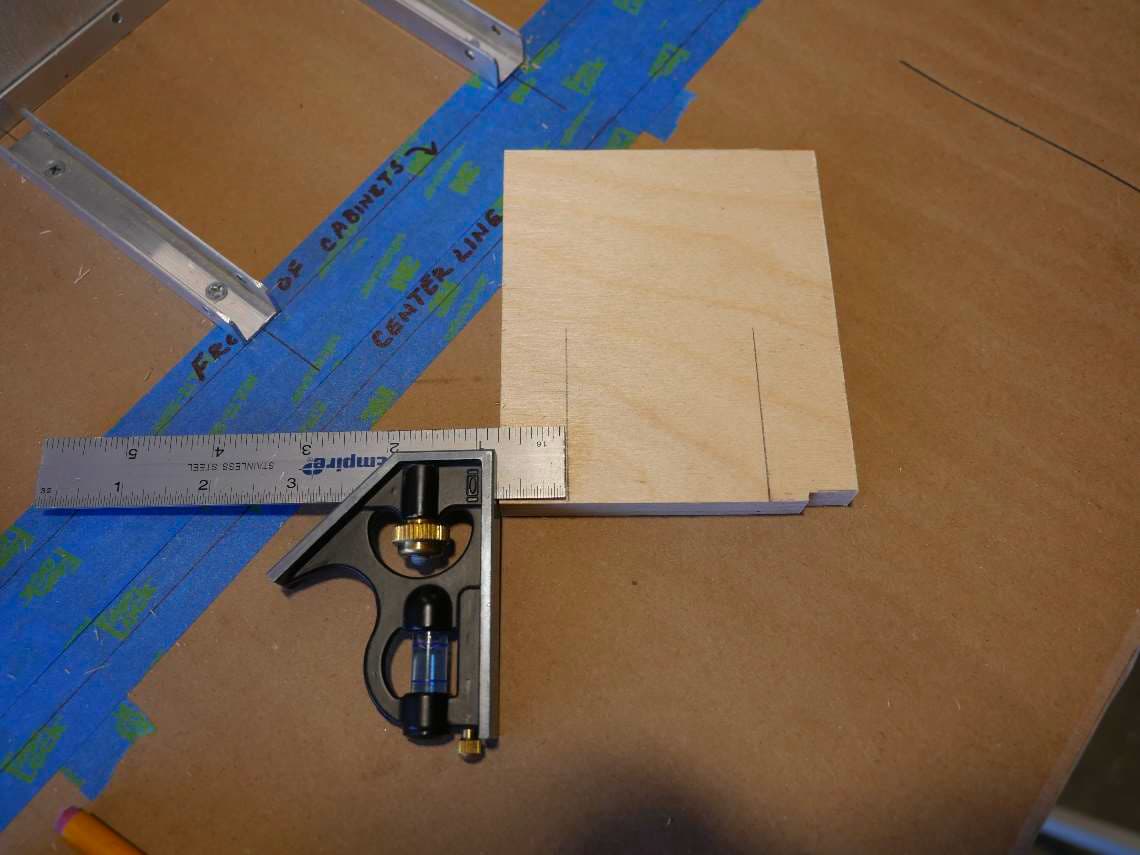
I got ahead of myself and extended the lines before I took the photos but in the upper photo I set my
combo square to 1” and then made a mark measuring from the bottom up. And then in the photo
below I reset the combo square to ¾” and made a mark from the top down. For full sized construction
these would be 1 ½ or 2 inches from the ends. If the panels were tall I might add a 3rd line in between.
Reset the combo square to 2 -3 inches and extend the lines, (Yeah I already did that…)
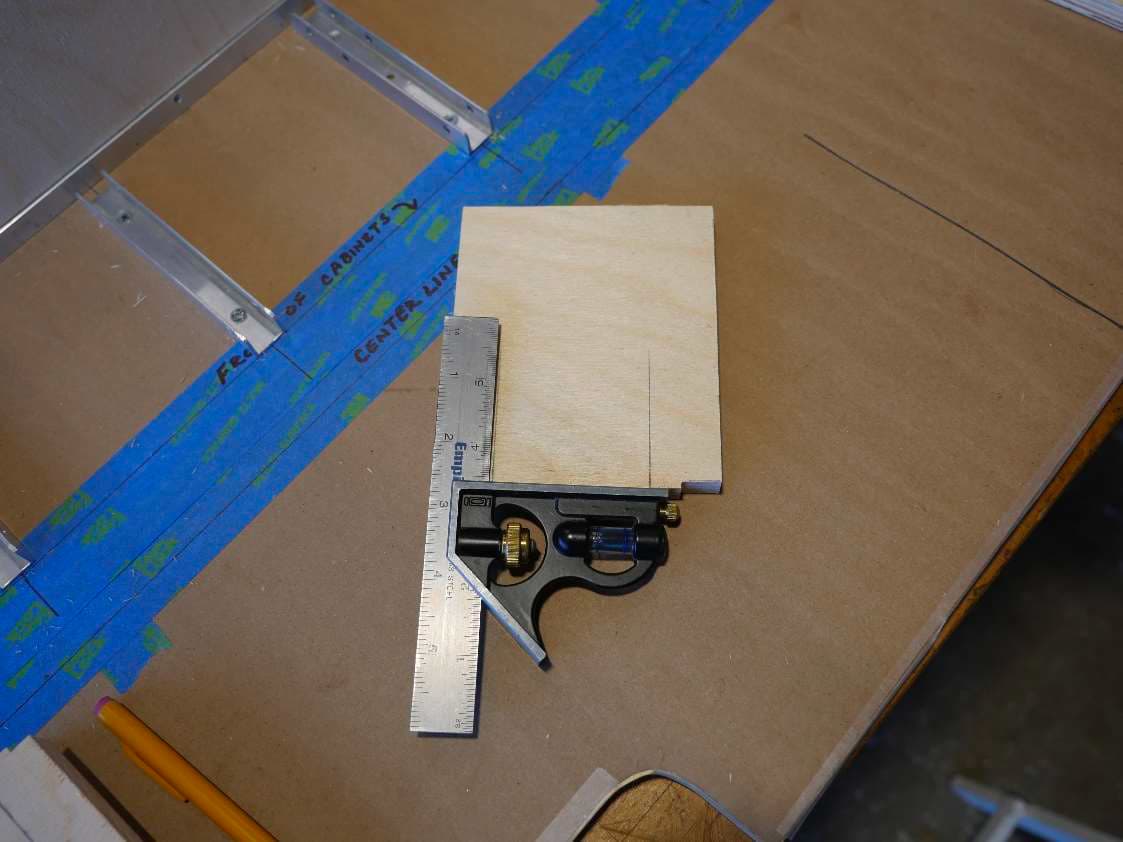
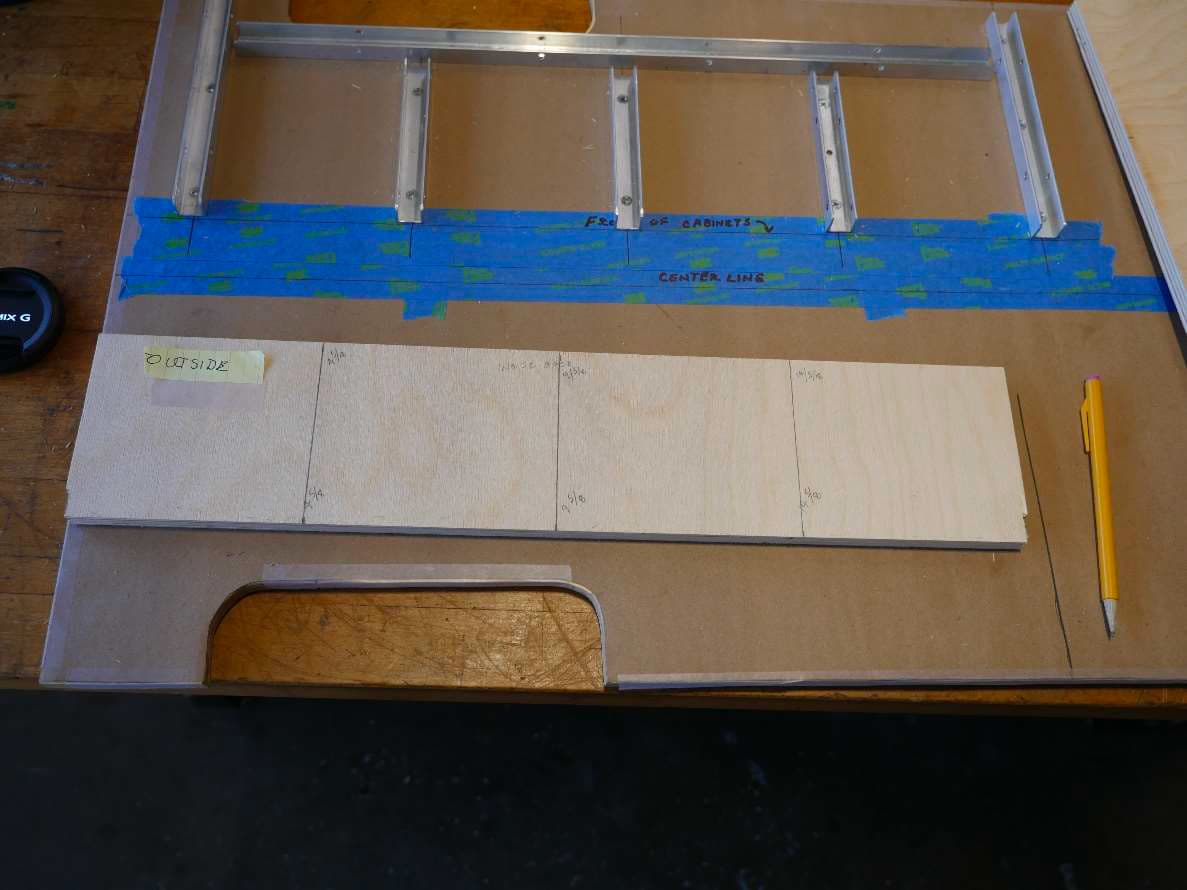
All the side panels are marked at the points where I want to install cross dowels. Notice I added my
circles and arrows so that I know these panels get the cross dowels and I can use the jig for drilling.

Now I have 2 problems. The mating holes for these cross dowels are located in the middle area of the
back panel so I can’t use the jig, and I have no idea how to place them accurately enough to match up
properly with the cross dowels installed in the dividers.
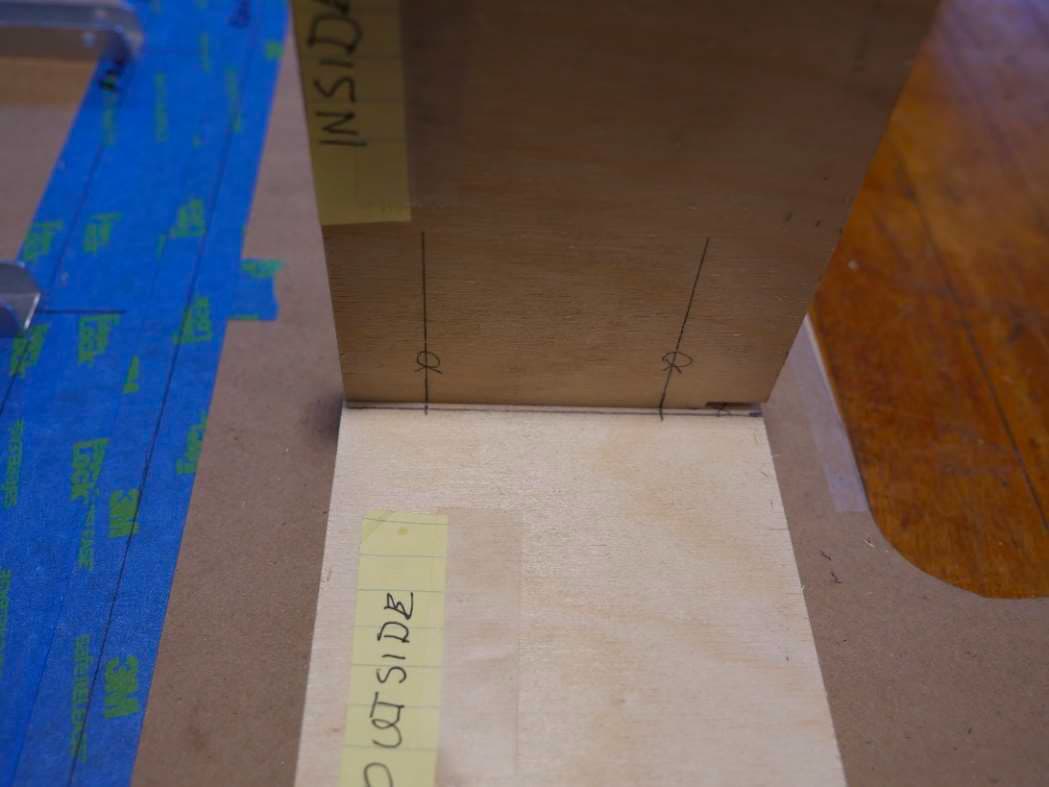
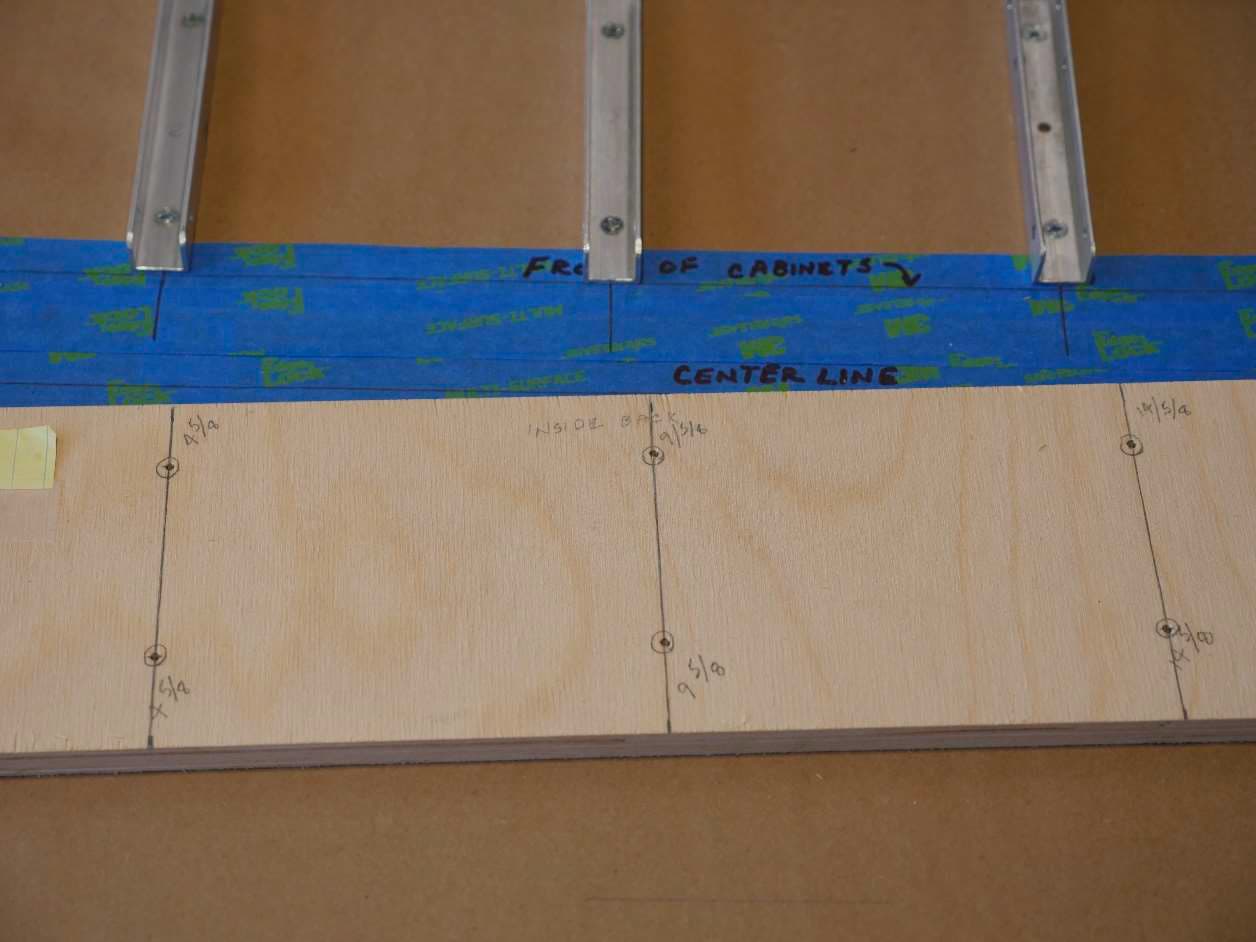
Here’s how you do it. Remember that we extended the layout lines we made for mounting the C-
channel to the floor beyond the front panel layout line. We extended this line just for this purpose. Lift
up the back panel so the inside surface of the panel is facing you. Now set it down in front of the
dividers and center it between the head and foot board panels.
Now make a mark at the base of the back panel where the centerlines of the divider layout lines extend
in front of it. TaDa, you have just marked the exact center of the plywood dividers and you didn’t have
to do any complicated measuring. Cool huh?
Well I told just a little fib. There is some measuring you’ll have to do here. The height of a full sized
panel will be wider than your little combo square so you’ll need to do a little bit of measuring to be able
to accurately extend the line across the full height of the back panel.
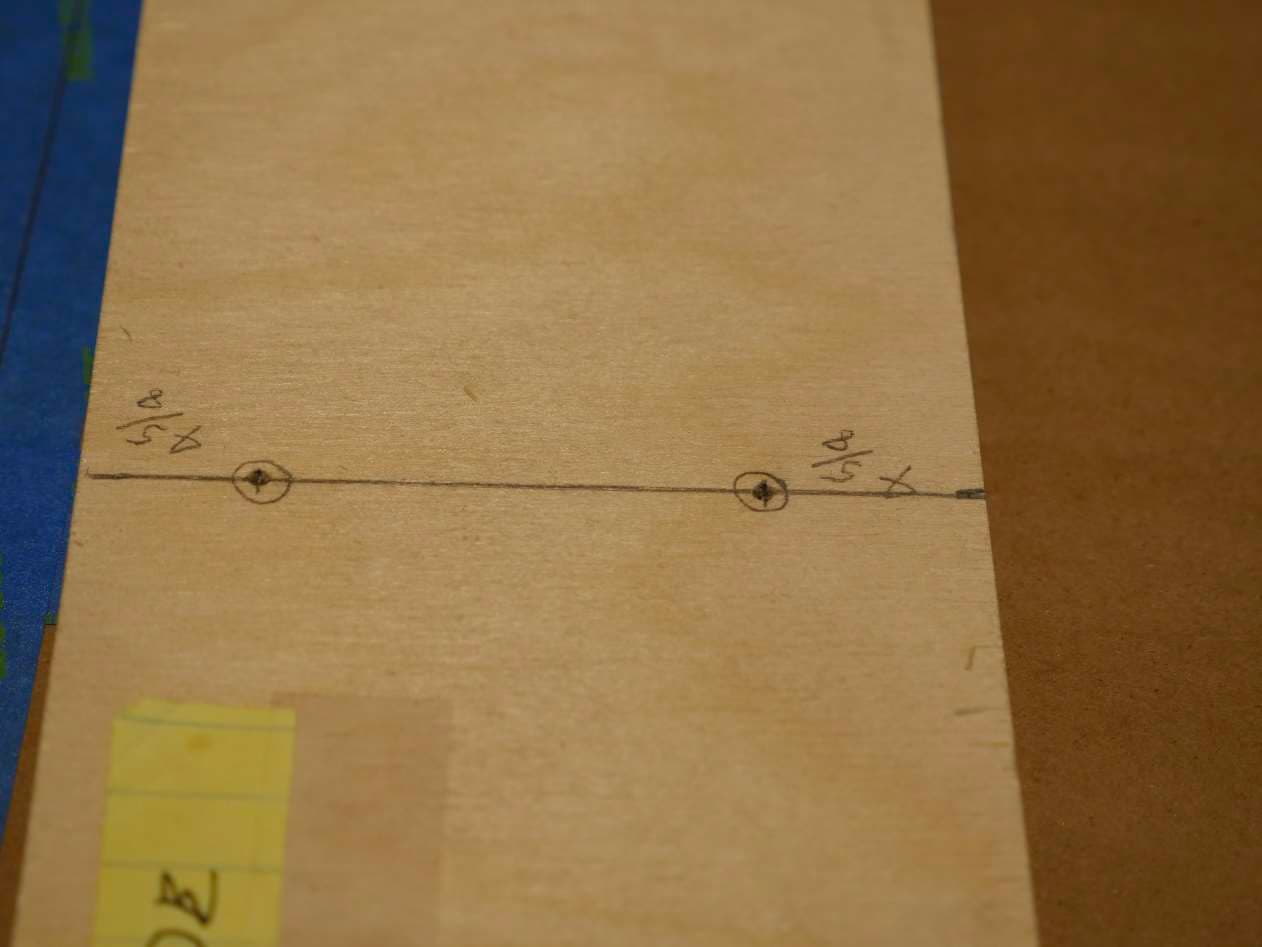
Lay the back panel flat and measure (from left or right it doesn’t matter) the distance from one of the
edges of the panel to each mark you made at the base. Write this number down next to the mark. Now
move your tape measure to the top of the panel and duplicate the marks at the top using the exact
same measurements. You should be working to an accuracy of 1/16 of an inch.

Now that you have matching marks at the top and bottom of your panel, use a straight edge (your
framing square works well here) and draw lines connecting the upper and lower marks. This line is the
exact center of the rear edge of your plywood dividers.
Now we have to determine where to drill our hole to mate with our cross dowels in the divider panels.
Take each panel in turn and set it just behind its line on the back panel, making sure that you have top to
top and bottom to bottom. Now use your original cross dowel layout line on the divider panel to make a
mark on the vertical line you previously made. You have now located the position to drill the mating hole
for your cross dowel locations for that panel.
All of our divider panels are the same with the same spacing for the cross dowels. In full sized
construction this may not be true so I recommend that you do each panel individually, mating it up with
its corresponding line on the back panel and marking the cross dowel location lines.

This completes the divider/back panel layout.
Now it’s time to install your cross dowels in the divider panels using the cross dowel jig.
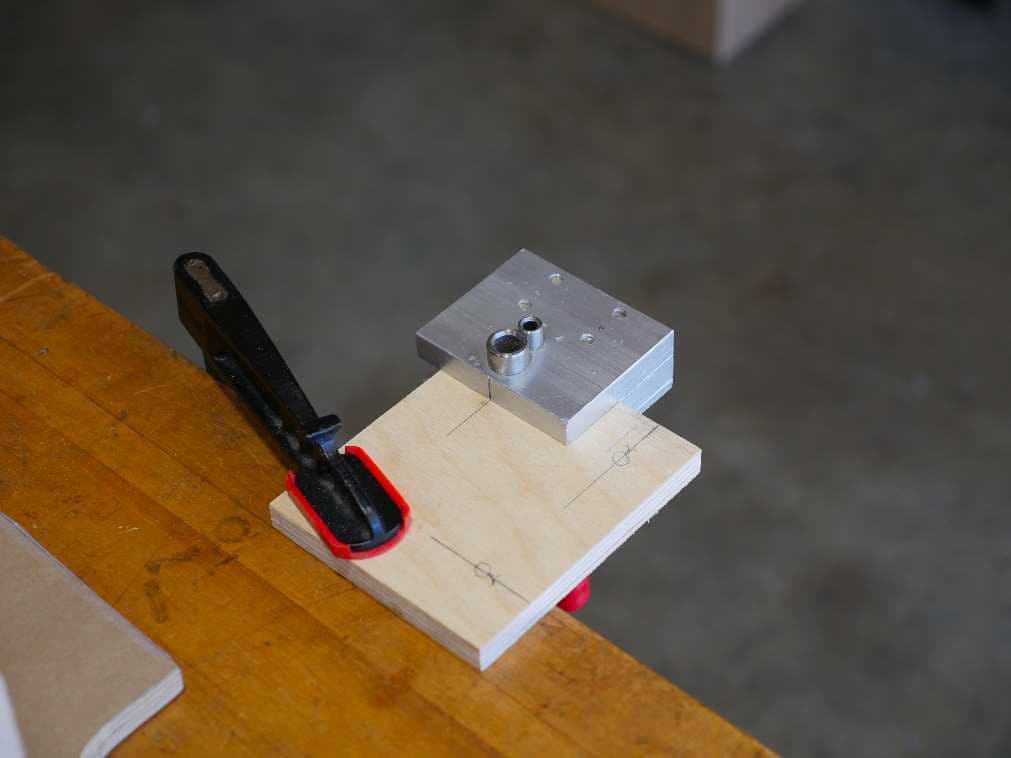
To drill the mating holes in your back panel, use your automatic center punch at each point you wish to
drill a hole and then drill your through hole.
Lay out your drilled pieces just as you marked them and double check to see that each cross dowel lines
up with it’s mating through hole in the back panel.
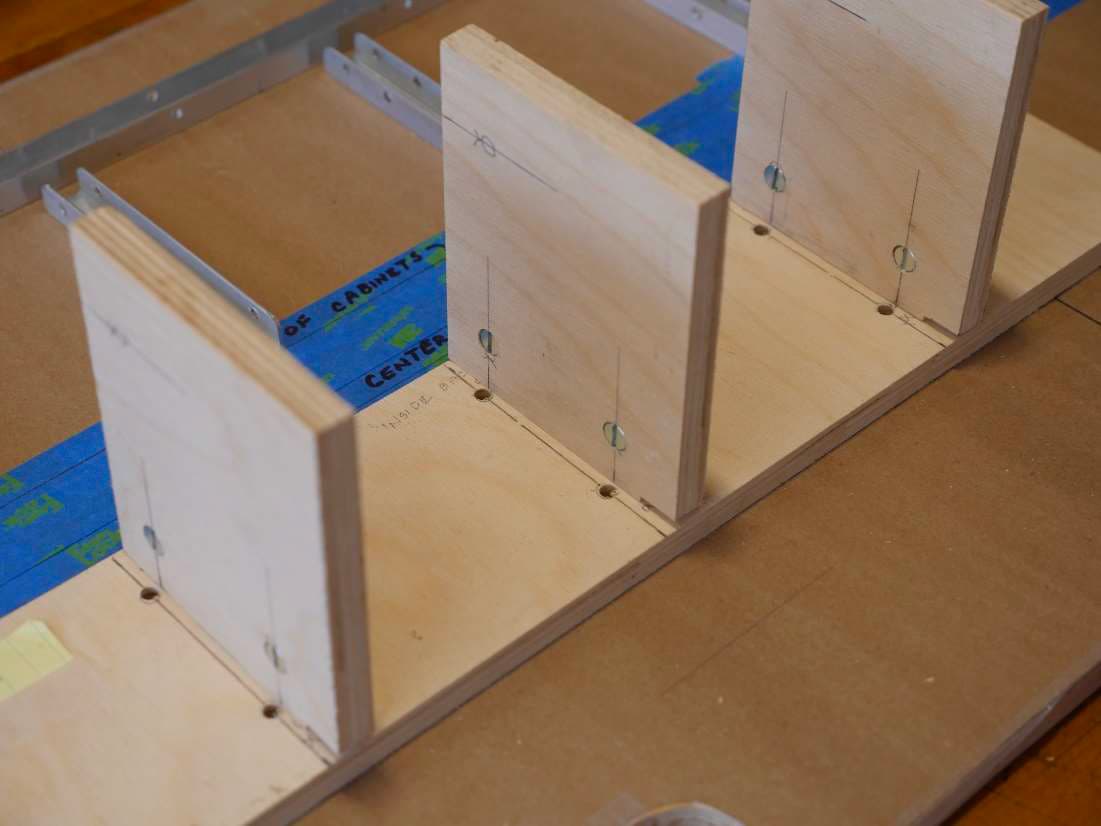
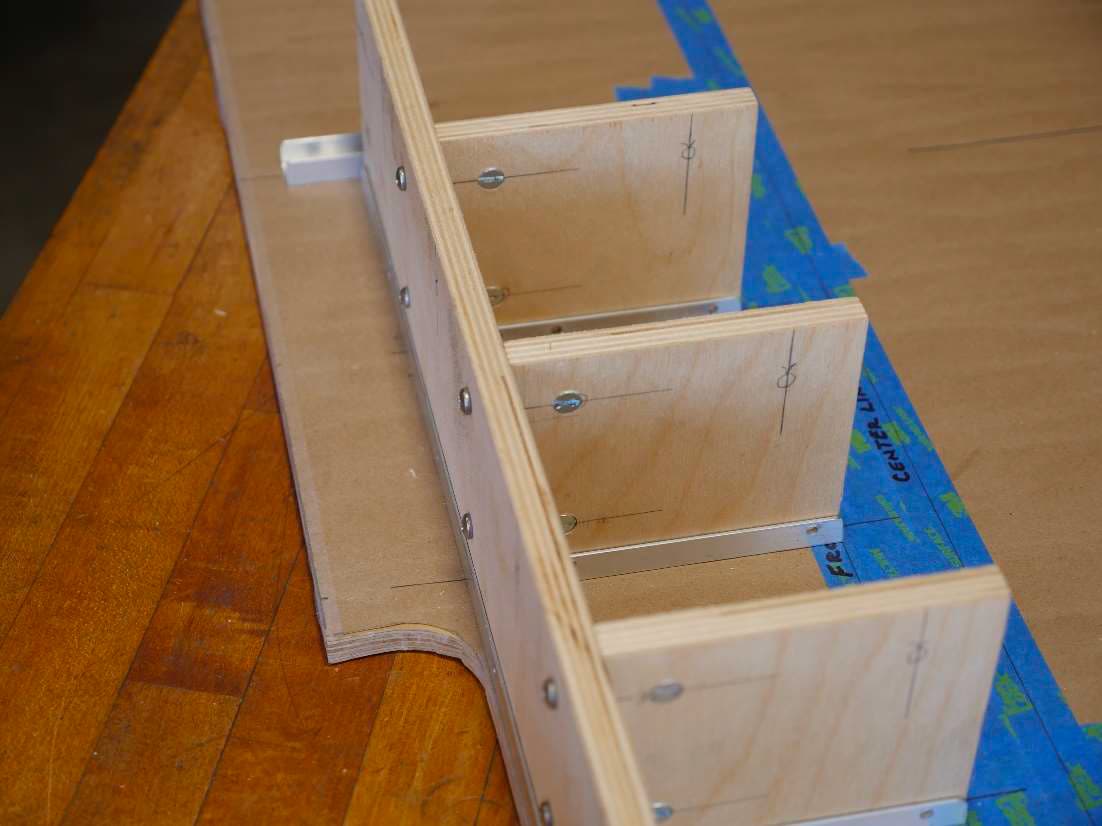
Now assemble what you’ve completed so far and make sure everything fits properly. Put the back panel
in place. See how the lines on the back panel line up with the center of the C-channels?
Set the compartment divider sections in their proper places. I number all my panels and their positions
so that I can quickly place them in their proper positions. This way I don’t get frustrated when all the
panels aren’t identical and may not fit in every location.
Tada! Everything lines up perfectly! I used pan head screws so that they can easily be seen in the
photos. You can use flat head screws if you wish them to be flush with the wood.
There are several things to take note of.
We first we decided where to install the cross dowels – which panel was the “inside” panel, and the
actual cross dowel location in the panel.
To locate our cross dowel positions, we used the little 6 inch combination square, but we could have just
as easily drawn them freehand since the precise location of each cross dowel is not critical.
We then extended our layout lines and added our symbols so we know that cross dowels will be
installed on that panel.
Wherever possible we used previously drawn layout lines:
- We used the extended centerlines from the C-channel layout to determine where the center of
the plywood would fall on the back panel and marked this position and extended it the full
height of the back panel. - We then used the cross dowel position layout lines on each panel to determine where on the
center lines on the back panel to drill our holes to line up with our cross dowels in the divider
panels. We did each panel individually in case there were differences in location of the cross
dowels between panels.
Remember, I’m working on a model so that you can see everything in context. The process works
exactly the same on full sized cabinets. The only difference is how many cross dowels you’ll use.
On cabinets that are around 16 to 18 inches tall, I may use only two cross dowels on the back, and top.
With the panels anchored to the C-channel on the bottom, three sides will be firmly anchored, binding
everything solidly in place. If I expect to put very heavy items in a large/wide drawer, I may use three
cross dowels in the back and top to make sure the weight in the drawer(s) doesn’t warp the ½ inch
plywood.
On 36 inch cabinets I’ll use 4 cross dowels, and on floor to ceiling cabinets I’ll probably use 7 or 8 cross
dowels. I generally space cross dowels between 6 and 12 inches apart depending on the situation.
Two cross dowels is the minimum to keep a panel from twisting. In my battery compartment I used 3
cross dowels on the sides of my battery box even though it was only 12 inches high, because I wanted
the strength to hold the batteries in place on bumpy roads.
Next we’ll work on the head and foot boards.
4- The Basic Cross Dowel Joint
6. Bed Construction, Head and Foot panels