Making a proper crimp when putting lugs on the ends of wires requires that 3 things all work in concert.
- The wire should be of the correct type (though there’s some leeway)
- The lug must match the wire type and size as well as the crimper
- The crimper must be of the correct type for the lugs you’re crimping
Wire Type
The wire you use – especially when you intend to crimp lugs on the ends – is critical. Never, never,
never, (did I mention never?) try to crimp lugs onto solid wire. This is the type of wire (Romex, NB,
THHN, THWN, etc) used for wiring buildings and is what you’ll find at the big box hardware stores. The
process of crimping crushes the wire and severely weakens it, to the point that it will often break off
inside the lug. Murphy’s Law almost guarantees that this will happen after your build is completed, and
accessing the bad terminal will require complete disassembly of most of your van. Solid wire is
specifically designated for use where it can be securely anchored in place so that it can’t move or
vibrate. Over time vibration and/or mechanical flexing of solid wire will cause it to fatigue and break.
Next is common residential stranded wire. This wire has the same designations as the solid wire (NB,
THHN, THWN, etc), but each conductor is made up of several individual smaller wires – usually less than
a dozen – in the common sizes we’re likely to use. This wire type can accept crimp-on terminals, but it is
very stiff and is only marginally better for a van build than solid wire. Use it if you have too, but you’re
better off using something else.
What you are looking for is wire made up of dozens if not hundreds of tiny wires. This wire is very
flexible and can withstand lots of vibration and mechanical flexing without harm. For the larger sizes
like #6 up through 4/0, there are two general types: Welding Cable and Marine Grade Cable.
Welding Cable and Marine Cable are almost identical as far as their flexibility and resistance to vibration.
What sets them apart is that in marine cable, each of the individual tiny strands is tin coated so the wire
looks silver. The tin coating makes this wire resistant to corrosion, (turning green), and is the only real
choice for boats in a marine environment. Welding cable works fine in most RV situations but using an
anti-oxide grease on the bare ends of the wire before the connector is crimped on is advised.
I use an anti-oxide grease on all my large connectors, even when using Marine Grade Wire. We used
this in the electric power industry where I worked for over 30 years and I continue to use it today. No-
Ox-Id made by Sanchem, Inc. is the brand I use but there are others that work as well. Available from
Amazon.

The smaller sizes of super flexible cable like #16, #14, #12, & #10, are really only commonly available as
Marine Grade Wire. The big dog in the marine wire industry is Ancor. These smaller sized wires are
what you would use to run from your Blue Sea 5025 or 5026 fuse blocks to feed your 12v receptacles,
USB charge ports, roof fan, lights, and etc. For these smaller wires you often need to crimp a “ring”
terminal on one end to go under a screw on the fuse block, and a push-on “disconnect” terminals on the
other end to attach to the plug or receptacle. You can use a “forked” terminal, but these can come
loose over time and for mobile applications I always use ring terminals.
There are two basic types of ring terminals, insulated and uninsulated. Here’s an example of both types:
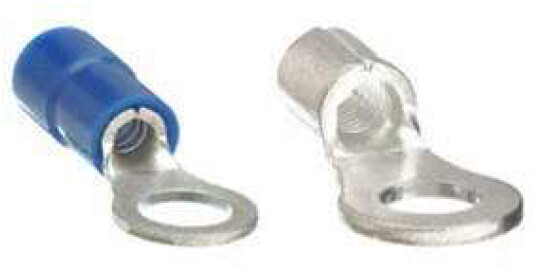
It is important to understand that the crimp tool you use will be rated specifically for one or the other.
Trying to use a crimp tool rated for uninsulated terminals with insulated terminals will lead to nothing
but frustration. Make sure you purchase the correct tool for the job.
For all my distribution wiring I use insulated terminals. These come in different sizes and there are two
dimensions that you need to pay attention too.
Wire Size
Insulated terminals commonly come in 3 different colors that designate the size wire they are meant to
accommodate.
| Color | Size |
|---|---|
| Red | 22ga to 18ga wire |
| Blue | 16ga to 14ga wire |
| Yellow | 12ga to 10ga wire |
Often you can get one size larger wire to fit into a smaller terminal (16ga wire into a Red terminal) and
this usually works OK. Likewise, you can obviously fit a smaller wire into a larger terminal, but you need
to be very careful here. If the wire is two or more sizes smaller it may not crimp properly and you risk
the wire pulling out of the terminal over time. Best practice is to use the proper sized terminal for the
wire size.
Hole Diameter
The next measurement is the diameter of the hole in the terminal. For Blue Sea 5025/5026 Fuse Blocks
the fuse terminals are a #8 screw and the main power feeds at the top and bottom are #10 screws so
you need to purchase terminals with holes designed for these screw sizes.
The main feed to my fuse bocks is #4ga wire so I make sure my wire terminals are rated for #4ga wire
and #10 screws. All the rest of the wiring to my fuse blocks is one of the smaller gauge wires so I have
Red, Blue, and Yellow ring terminals for both #8 and #10 screw sizes. This fits 95% of my ring terminal
needs. Occasionally you’ll need a different hole size. Just remember to purchase the proper sized
terminal.
Far End Terminations
The other end of the wire from your fuse block will need to connect to something and what it connects
too will determine the type of terminal you’ll use. Sometimes it’s a ring connector and you’re all set.
More often than not it’s a ‘disconnect’ style connector. There are both Male and Female styles of these
connectors. The male connector will slip into the female connector as long as the size of the connectors
is the same.
They come in 0.250” (most common), and smaller 0.187”. You’ll find often find the larger width on
things like USB charge ports and 12v receptacles with the smaller ones on small switches. These two
sizes are independent of the sized wire they are designed for. Think of them as equivalent to the hole
size in the ring terminals. Just like ring terminals, these come in Red, Blue and Yellow for the different
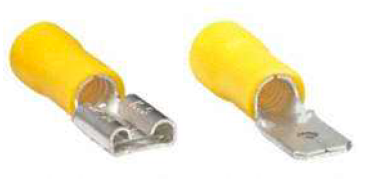
wire sizes. Here’s a male and female disconnect meant for #12ga or #10ga wire. Notice that the
terminal itself is not insulated.
Here are fully insulated disconnect terminals. These are handy for things like the MaxxAir/Fan-Tastic
roof fan. You can put a males on the fan wires and females on the wire from the fuse block and just plug
them together. If you need to take the fan out for service, just unplug it. What’s cool about these is
that they are self insulating. You don’t need to cover them in electrical tape to keep them from shorting
out.
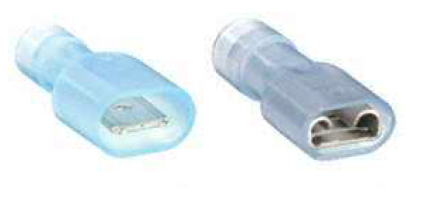
You can see that the male spade insulation is larger in diameter than the female socket so they cover
each other when engaged. Remember that the color has to do with the size wire they are designed for
not how the insulation works. This style comes in Red, Blue, and Yellow like all terminals.
There are several types of these insulated terminals. There are nylon, heat shrink, PVC, and other types.
The best is the highend heat shrink with thermal glue. Not really necessary for an RV environment.
Nylon and PVC are adequate to our purpose. The yellow examples above are PVC. The blue examples
are nylon which often have an integrated strain relief ferrule built into the terminal.
*** NOTE The heat shrink style terminals require a different tool than the nylon and PVC terminals.
Since heat shrink terminals are expensive, uncommon at the local hardware store, and not needed for
RV service, I’m not covering this type of tool.
Crimpers
Lots of different style of crimpers out there. Some work better than others – a lot better. For the larger
wires like #6ga up to #4/0ga you might be better off finding a batter shop that will make custom
jumpers for you.
The first type of crimper that most recommend is the Hammer Crimper. I’m not a big fan of Hammer
Crimpers. I don’t own one and I don’t use cables made with them. The only thing they have
going for them is that they’re cheap. They make a mess of the connector and often don’t crimp
securely as they only crimp the center of one side of the terminal. A proper crimp applies
pressure rather equally around the full circumference of the terminal. On a Hammer crimp you
find that the center strands of wire are mashed while the strands to either side are actually
somewhat loose. Lots of opportunity for corrosion, and both electrical and mechanical failure of
the crimp over time. Around $20-$40
The gold standard is a crimper like the FTZ 94284. These things are amazing but at an amazing price as
well. $175-$200. If I were in the business of wiring RV’s I’d have one of these, but since I make a few
dozen crimps a year it’s just not worth the price for me. This crimper is especially suited for the FTZ
terminals which are the best of the best, and of course, uber expensive as well. Definitely Pro level, but
overkill for me.
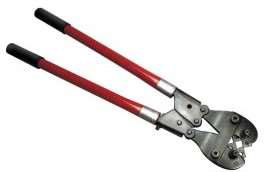
I use a hydraulic crimper for my large battery cables. Serviceable, but not the best. These things are not
really made for US wire sizes so it takes a lot of experimentation to get a good crimp. For most wire I
need to change out the crimping dies several times to make a proper crimp. Just not feasible to go
through that process here, but this is the crimper I use if you are a glutton for punishment and want to
give it a go. $70-$
https://www.amazon.com/Hydraulic-Crimper-Battery-Terminal-Crimping/dp/B07V3R97TY
Here’s a link to a video showing the process. Notice that once the insulation is stripped and the
terminals are fitted, he makes a crimp with an initial large set if dies. He then changes dies to a smaller
size and goes through the crimping process again. This is repeated until the terminal is solidly crushed to
hold the wire but not enough to damage the terminal. This is not difficult but takes some practice and
experience to know when the wire is properly crimped. I always use No-Ox-Id on the wire when making
these large crimps to cut down on possible corrosion.

Here’s a link to Rod Collin’s blog on making your own battery cables. I learned a lot from this guy and
you will too. Ran across his blog 10 years ago when it wasn’t quite as polished. Highly recommend that
you read through this entire post and poke around a bit as well. Years of experience here. He’s focused
on Marine work but much of it applies equally to RV service. Good stuff. At the bottom of the post he
takes you through the various dies and what good and bad crimps look like.
Crimping Tool for the Smaller Wires
What you will want is a crimper for the smaller distribution wires as there could be a several dozen
terminals you’ll need to crimp for these wire sizes and the process is more straight forward. You should
be using colored insulated terminals for all this small stuff so everything is color coded and the only
decision you really need to make is what crimping tool to purchase.
There are several types of tools but really only one if you want to do the job correctly and have zero
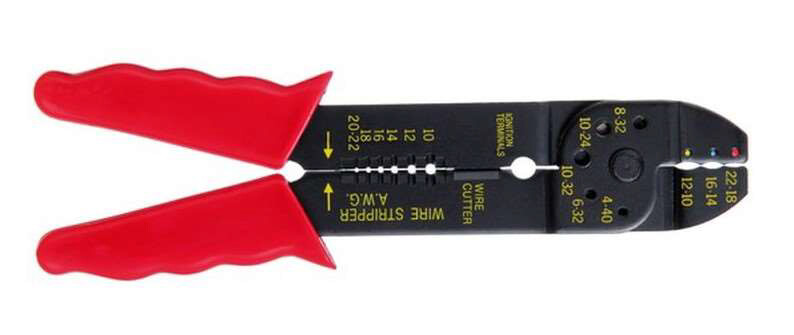
problems. First the poor options. These are available at the big box hardware stores. They have a very
narrow crimping surface and are marginal at best. They often incorporate really bad wire stripers in the
rear portion of the handles. You’ve seen them. Different colored handles but the business ends are all
the same. $5-$10.
Here’s the next step up. These are much better than the el cheapo’s above, but still have some
problems. Notice that the jaws have a single hinge point and open in a V shape just like the cheaper
ones. The larger terminal position in the back is at the bottom of the V. Makes it difficult to insert the
terminal and the overall leverage is poor. I have a pair of these and sometimes I don’t have enough
strength to properly terminate a large yellow terminal. Different brands have different colored handles
but they all work the same. $25-$45.

If you want the gold standard then you’ll want a Milspec TE CERTI-CRIMP. These things are awesome.
The jaws move absolutely parallel and they make perfect crimps. You must change the dies for each
different sized terminal, and the tool must be “setup” or “calibrated” each time you change a die, but
once set up you can make thousands of perfect crimps, until you need to change the dies and then you
get to start over. This is the tool used for making wiring harnesses for aircraft. Yours for the paltry sum
of $1299.
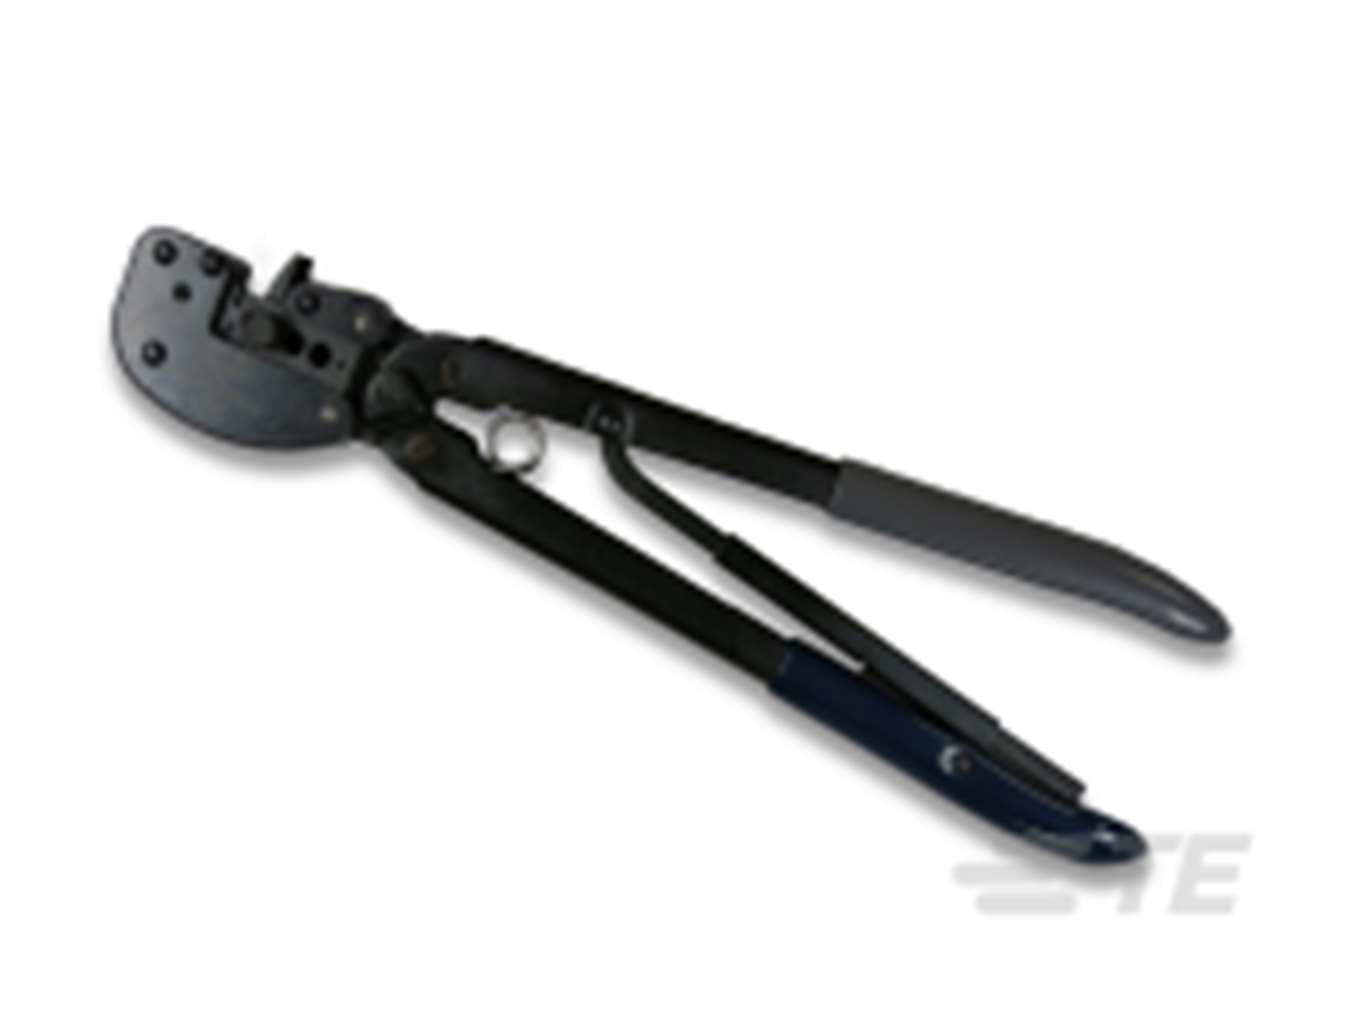
Here’s the type of crimper I use and recommend. I originally ordered mine over 10 years ago from Rod
Collins off his blog. I think he may have been instrumental in their original design. The one he sent me
had no brand name. Alas, he no longer offers them, but Amazon to the rescue with the exact same
design by Capri. It’s similar to an aerospace crimper that costs over $600, and it works fantastic. Once
you use a crimper like this you’ll never want to go back to the cheaper type. What sets this crimper
apart is that the jaws move almost parallel up and down. When the jaws are open they create a
rectangle not a Vee. Plenty of room for that big yellow terminal in the back. $50-$60.

One thing that may not be obvious to the uninitiated is that with this style crimper it matters which
direction you insert the terminal. One side of the tool has colored dots. If you look closely, you see that
there is a “hump” in the upper jaw above the colored dots. It’s there to form the insulation (and strain
relief ferrule if there is one) on the terminal around the wire as it’s crimped. So the back end of the
terminal with the wire sticking out is on the colored dot side of the crimper.
The other side where the terminal ring or disconnect spade will be, is a smooth ellipse on both the
upper and lower jaws. This smashes the metal portion of the terminal and solidly crimps the wire in
place.
There’s also a ratchet that forces you to make a solid connection before the jaws will release the
terminal. If you’re going to do your own wiring, this is the tool to get. Well you could get the
commercial aero space version, but this one will do just as well at 1/10th the price. Available on
Amazon.
Here’s a link showing how to use the $600 version of this tool from TE Connectivity, Inc. These crimpers
have interchangeable jaws, they show the type of jaw/terminal we’re using about ½ way through the
video. No colored dots but you’ll easily see the “hump” on the side where the wire is inserted.
Private video
https://youtu.be/V8ll2ZcYMrk
Rod Collins comes through again with a blog page on crimping smaller wires. He used to offer the Capri
style crimper on this page but alas it’s no longer shown. Again, really good stuff. Here’s the link.
Hope you find this information useful,